Hiking the Grayson Highlands – Solo Backpacking Trip

Join me for 3 days of Solo Backpacking, Hiking, Hammock Camping, & Wild Ponies on the Appalachian Trail in Virginia’s Grayson Highlands.

For this backpacking trip, I’ll be hiking and camping solo in a section of the Mt Rogers National Recreation Area, within the larger George Washington and Jefferson National Forest.  I’ll be using a portion of the Appalachian Trail to create a 3 day, 2 night backpacking loop of around 20 miles or so.  The Grayson Highlands are known for their high winds and unpredictable, rapidly changing weather, so being that I’m doing the trip in March, I’ll be packing amount of warm weather and rain resistant gear.  If you’re interested in a detailed account of everything that I packed, check out my previous Winter Ultralight Backpacking Gear List blog post and video.  That will give you a look at exactly what I packed for the trip.

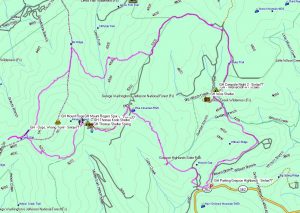
Grayson Highlands Backpacking Trip Route Overview – Sintax77

Below is a daily rundown of the trails and campsites used for each day.  Full GPS track data can be found on the Trip Data page.

Parking Location

Grayson Highlands State Park, Overnight Backpacker’s Parking Area at the Massie Gap Parking Lot.  N36° 38.012′ W81° 30.322′

Trails Used, Day 1

  • Depart Massie Gap Parking Lot
  • Rhododendron Trail
  • Appalachian Trail South
  • Wilburn Ridge Trail (it’s also possible to stay on the AT)
  • Rejoin the Appalachian Trail South
  • Setup camp about 200 yards past the Thomas Knob Shelter.

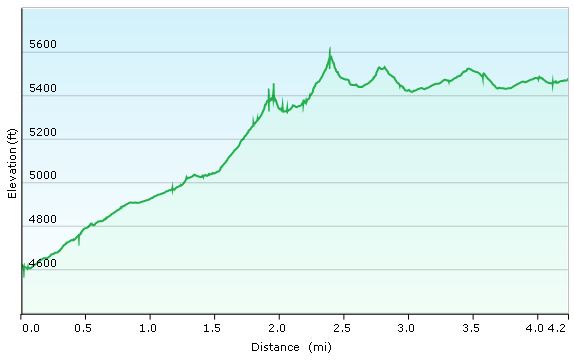
Day 1 Mileage: 4.25 miles
Day 1 Elevation Gain: 2,096′

A spring is about a 100 yards down the trail behind the shelter.

Camping options for tents and hammocks are available a few hundred yards past the shelter, heading south. Tenting spots are on the ridge to the left, hammock camping opportunities are in the trees to the right.

There are also some nice campsite opportunities about a 1/4 mile or so before the shelter as well (AT north from the shelter)

Grayson Highlands Day 1 Elevation Profile – Sintax77

Trails Used, Day 2

  • Continue on the Appalachian Trail South
  • Mt Rogers Trail Towards Grindstone Campground (not to be confused with the Mt
  • Rogers Spur Trail which hits the summit of Mt Rogers.  That trail is available shortly after leaving the campsite.  I’ve heard it doesn’t have any views, but it holds the distinction as Virginia’s highest peak).
  • Lewis Fork Spur Trail (turn here a couple of miles before hitting the campground).
  • Cliffside Trail
  • Crest Trail
  • Scales Trail
  • Setup Camp near the intersection of Scales Trail with the Appalachian Trail

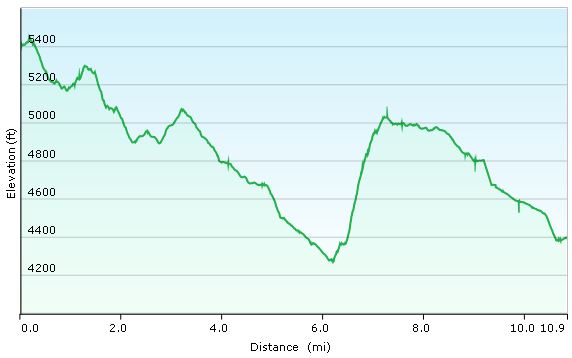
Day 2 Mileage: 11 miles
Day 2 Elevation Gain: 1,320′

There are a number of hammock and tent camping opportunities on the edge of the field opposite from the AT intersection.

There is plenty water in several directions from the intersection. The particular campsite I used (tagged in my GPS data) has water right next to it within 20 yards or so.

Grayson Highlands Day 2 Elevation Profile – Sintax77

Trails Used, Day 3

  • Continue on the Scales Trail South (note: it is possible to continue on the AT
  • South and eventually make your way back to the Massie Gap parking lot as well.  I chose the scales route because it is considerably quicker and I had to do a long drive home upon reaching the lot.)
  • Seed Orchard Trail (this wasn’t on my Nat Geo Map, but after coming out of the woods, you’ll see a sign directing you towards the AT by turning right.  Instead, look left.  You’ll see a water crossing with a brown Grayson Highlands State Park sign listing various rules and regs.  The path along the fence over there is the Seed Orchard Trail)
  • Follow signs towards Hickory Ridge Campground.
  • Past the campground, there will be a large metal gate for a Horse Trail
  • Follow the Horse Trail (there doesn’t seem to be a fancier name for it)
  • Appalachian Spur Trail towards the Backpacker’ s Parking Lot
  • Return the Massie Gap Parking Lot

Day 3 Mileage: 3.5 miles
Day 3 Elevation Gain: 499′

Grayson Highlands Day 1 Elevation Profile – Sintax77


Trip Grand Total Mileage: 18.75 miles
Trip Grand Total Elevation Gain: 3,915′

Map Used for this Trip: National Geographic Map #318, Mt Rogers High Country

Katadyn BeFree Water Filter Review

My thoughts & review of the Katadyn BeFree Collapsible Water Filter Bottle – 0.6 Liter for Backpacking & Camping

The Katadyn BeFree is a backpacking water filter with a very small footprint and low overall weight.  In this video I’ll cover all of the bases from the initial unboxing, to specific features, individual item weights, test usage out in the field, pros and cons based on individual backpacking styles, as well as some thoughts of future improvements for the system.

Specs and Features as per the Manufacturer

  • Dimensions (in) 9.05
  • Diameter (in) 2.73 ∅
  • Output (gal) 2.11 quart/min
  • Technology Hollow fiber filter 0.1 micron
  • Weight (kg) (oz) 2.05
  • 0.1 micron water filter removes harmful organisms like bacteria 99.9999% and protozoa like Giardia & Cryptosporidium 99.9%, surpassing EPA standards
  • Collapsible 0.6L hydrapak soft bottle flask packs down small to fit in tight spaces (pant or jacket pockets, purses, cycling jerseys, fly vests.
  • Ez-clean Membrane is simple and easy to clean by simply shaking or swishing the filter to clean debris, no backflushing or extra tools required
  • Filters up to 1,000 liters of contaminated water without using chemicals or other devices and • hydrate quickly and easily with the free flow channels fast flow rate
  • Stay clean drink nozzle keeps the mouthpiece clean and sanitary (replaceable with standard plastic water bottle caps)

Update: After further research, it looks like there may indeed be a third party bag that works with the wide mouth threads on the BeFree filter cartridge.  It looks promising, but I have not been able to personally test it’s compatibility.  It’s called the Hydrapak Seeker 2L Water Storage Bag

HikingBear Trekking Poles Review

A Review of HikingBear Trekking Poles

In addition to checking out the Hiking Bear poles I also discuss my personal experiences with finding the the right trekking poles for ones individual needs in terms of balancing price, features, quality, etc.  For comparison, I compare to other poles to the HB poles, as well as go over the differences in how to use the trekking poles in terms of locking mechanisms, etc.

Other poles seen in the video
Suisse Gear Trekking Poles – my first budget hiking poles.
Black Diamond Ultra Mountain FL Z-poles – heavier grade poles for more rugged winter trips, mountaineering trips, etc. (no longer in production?)

Specs for the Hiking Bear Trekking Poles, as per the Manufacturer

Carbon Fiber Shaft for reduced weight with and increased strength vs aluminum
Weight: 8.1 ounces per pole (I confirmed this on my own scale)
3 section collapsible shaft.
Collapsed length: 25.6 inches.
Maximum expanded length: 53.1 inches.
Grip: Ergonomic syncork grip made of soft EVA material with strap, waterproof and anti-slip texture.
Tip options for different terrain: Each pole comes with a pavement and a snow basket to prevent sinking in a variety of hiking terrain, especially muddy basin, snowfield or grassland.

Winter Ultralight Backpacking Gear List 2017

A detailed look at my 2017 Winter Ultralight Backpacking Gear List

For a detailed list of my winter backpacking gear, with itemized weights and descriptions, you can download PDF and CSV format copies of this list as well as lists for previous trips / videos my Gear Lists page.

List in PDF Format  for viewing and printing.

List in CSV Format  for use in your favorite spreadsheet or backpacking software.

Below is a simplified list of the backpacking items shown in the video (without weights or descriptions).

Pack
Backpack – ULA Ohm 2.0
Pack Cover – Dutchware Argon

Stuff Sacks and Storage
Bear Bag Stuff Sack, Water Resistant 8L
Bear Bag Line
Zip-lock Bag – Sandwich
Stuff Sack 4L
Zip-lock Bag – Gallon

Tools
Compass
Lighter – Eddie Bauer
Multi Tool – Tool Logic Card
Carabiner, S-Biner – Large
Carabiner, S-Biner – Mini
Fire Starter, Wet Fire
GPS Unit – Garmin Oregon 650

Cooking & Eating Utensils
Cook Pot – 750ml Titanium
Cookset Stuff sack
Matches – Waterproof
Fire Steel – Light My Fire, Mini
Pot Cozy
Spoon – backup, disposable
Spork – Sea to Summit Alloy
Windscreen – Titanium
Stove – Mini Canister Stove
Paper towels squares and Sea to Summit Soap slivers

Hammock System
Hammock Body – Dutchware Chameleon w/ over cover
Hammock Suspension – Dutchware Dyneema straps with Beetle Buckle

Sleep System
Under Quilt – Hammock Gear Incubator 0
Top Quilt – HG Burrow 0

Shelter
Tarp – Hammock Gear Cuben Hex Tarp
Ground Cloth – Tyvek, long
Tent spike – Titanium

Water Treatment & Storage
Water Filter – Sawyer Squeeze
Sawyer Filter Bag – 64oz Dirty
Water Bottle – 1.5 Ltr, Disposable
Spare water bottle caps.
1 Liter Bottle, Insulated – ‘Forty Below
Sawyer Filter Bag – 64oz Clean

Light Sources
Headlamp – Fenix HL21 w/ battery
Spare AA Battery
Flashlight – Preon 2

First Aid & SOS Messenger
First Aid Kit
Spot Messenger

Toiletries
Toilet Paper
Toiletry Kit
Wet Wipes
Hand Sanitizer

Clothing, Secondary & Spare
Jacket – Montbell UL Down Parka
Socks, Wool – Heavy Wgt
Hat, Beanie – Lt Wgt Fleece
Shirt, Long sleeve – Fleece Lt
Long Underwear, Merino
Shirt, short sleeve
Sock Liner, Med Wgt Carhartt
Pants, fleece lined by EMS
Gloves, Work

Clothing Worn
Hat, Beanie – Hvy Wgt
EMS Hard shell Jacket
Fleece, Military – Hvy Wt
Shirt, Long Sleeve -Lt Wgt
Shirt, short sleeve
Pants, Hardshell
Socks, Wool – Med Wgt
Long Underwear, Synthetic
Boots, Winter High Top Garmont GTX
Sock Liner, Med Wgt Carhartt
Gloves, Heavy Winter
Glove Liners, Merino Wool Lt
Face mask / neck gaiter by Seirus Innovation

Grayson Highlands Route Planning – Solo Winter Backpacking Trip Pt 3

Creating a Backpacking Loop for my upcoming winter solo camping trip in Virginia’s Grayson Highlands.

For part three of this series, I’ll be going over my specific route selection for my solo backpacking loop, including trails used, potential parking / starting points, and expected camping areas for each night.  The map I chose to purchase for this trip, based on viewer feedback, was National Geographic’s Map #318 for the Mount Rogers High Country Grayson Highlands State Park region of Virginia.

A good portion of this loop will utilizing the Appalachian Trail, within the Mt Rogers National Recreation Area, as well as several other connecting trails within the Lewis Fork Wilderness and Little Wilson Creek Wilderness areas.

I will be doing continued updates throughout the whole process of planning this winter hiking trip. All the way from location selection, specific route planning, packing, food choices, getting there, doing the actual trip, and whatever else may come up in between, so check back for updates!

Location Selected! – Solo Winter Backpacking Trip (Pt 2)

Based on Viewer Feedback I’ve Chosen the Location for my Solo Winter Backpacking Trip!

For the second installment of this series, I’ll be talking about my final choice for the location of the upcoming backpacking trip that I’ve been planning.  How did I make my decision on the final location for my winter camping trip?  You told me!

A very big thanks is in order for all of the super helpful viewers and subscribers that shared their feedback on the previous trip planning video.  Obviously, i had to narrow it down to just one area out of the hundred of backpacking routes that we shared, but I definitely learned a ton of useful info on areas for future trips as well.

For now though, I’m going to focus on the spot chosen for this trip.  Which is, of course, – Oh, come on, you didn’t think I’d really ruin the surprise by typing it here, did you?  🙂


I plan to do continued updates throughout the whole process of planning this winter hiking trip. All the way from location selection, specific route planning, getting there, doing the actual trip, and whatever else may come up in between, so check back for updates!