AllPowers Solar USB Charger Review

A detailed review of the AllPowers USB Solar Charger.

In this video, I go over my personal experiences and thoughts on the AllPowers Solar Charger, along with a detailed look at the features and specs.

For 10% off, click here and enter code 9KSMN867

Specs, as per the Manufacturer

  • Fast Charging Technology: Exclusive iSolar automatically adjusts the current and voltage to deliver its fastest possible current up to 4.8 amps per port or 5 amps overall under direct sunlight
  • Battery: Built-in 8000mAh. About 8-10 hours to fully charge under 70,000 lux light conditions. An hour charging can support 1.5-2.5 hours talk time
  • USB Outputs:  4 covered USB outputs (2 2.4A, 2 1A)
  • Size13.38×7.0x0.79 inch folded or 22.8×7.0x0.39 inch unfolded,
  • Weight 29.5oz
  • stainless-steel eye holes for attachment to backpacks, trees, or tents.
  • Package Contents: ALLPOWERS 21W Foldable Solar Charger, Carabiner, micro USB cable, instruction manual, 18 Month Worry-free Warranty and friendly customer service

Hammock Camping with my Dog – Seneca Creek Hiking & Backpacking Trip

Join my dog Denali and I for some Hiking, Backpacking, and Hammock Camping in the Seneca Creek Backcountry.

For this hiking adventure, my pup and I will be visiting the Spruce Knob-Seneca Creek National Recreation area, within West Virginia’s greater Monongahela National Forest. Our route will be a “lollipop”style hike – meaning we’ll use an “out and back” section of trail from the Spruce Knob trailhead parking area to connect with a series of other trails that form a loop. After completing the loop portion of the hike, we’ll backtrack out using the same section of trail from day one.

The Spruce Knob-Seneca Creek Backcountry offers around 60 miles of trails (marked with blue blazes) with an elevation range of 3,000 to 4,800 feet above sea level. The beginning of this particular loop is actually the highest point in all of West Virginia – Spruce Knob – standing at and elevation of 4,861 feet. Below is a list of trails for each day, along with stats for elevation gain and mileage.

Trailhead Parking: Spruce Knob Parking area (right by the observation tower).

Parking Notes:  No parking fees or overnight permits are required.  There are restrooms and bear-proof trash bins available for use.

GPS Track Data for this trip can be found on my Trip Data Page.

Trails used, Day 1

  • Huckleberry Trail
  • Hornton Trail (just for a short bit)
  • Judy Springs Trail
  • Seneca Creek Trail
  • Hammock Camp along Seneca Creek.

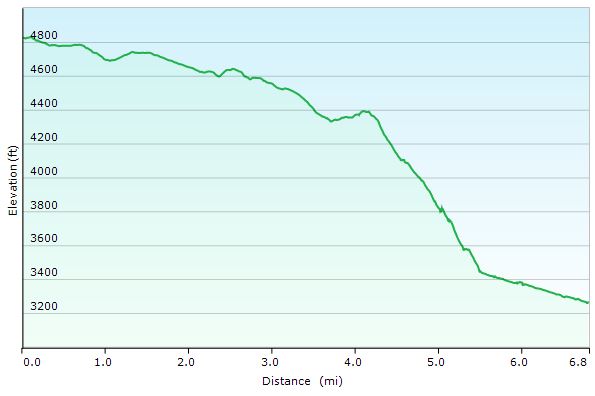
Day 1 – Seneca Creek Loop elevation Profile – Sintax77

Day 1 Mileage: 6.5 miles
Day 1 Gross Elevation Gain:  221 feet (pretty much down hill all day)

Trails used, Day 2

  • Seneca Creek Trail
  • High Meadows Trail
  • Lumberjack Trail
  • Join back up with Huckleberry Trail
  • Arrive back at Spruce Knob Parking Lot

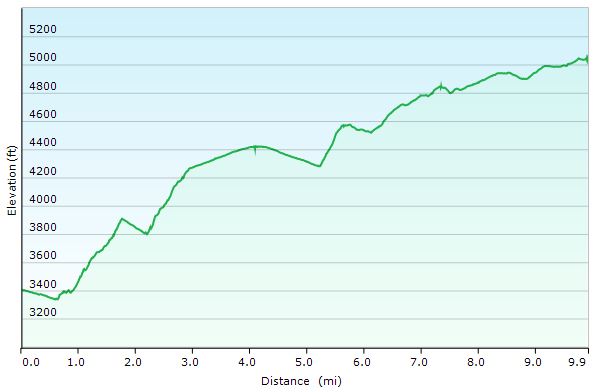
Day 2 – Seneca Creek Loop elevation Profile – Sintax77

Day 2 Mileage: 10 miles
Day 2 Gross Elevation Gain:  2,173 feet (pretty much up hill all day)

Notable Gear Seen in the Video

Denali’s Hammock – 2T’s Hammock Chair from Dutchware
Denali’s Dog Backpack – “One Tigris Cotton Canvas Dog Pack”
Denali’s Collapsible Dog Dish – Doggone Dish
Dutchware Chameleon Hammock
Hammock Gear Burrow 40 Top Quilt

Hammock Gear Phoenix 30 Underquilt
Hammock Gear Cuben Hex Tarp
Katadyn BeFree Water Filter
Toaks 750ml Titanium Pot
Vargo Windscreen
Esbit Solid Fuel Cubes
ULA Ohm 2.0 Backpack

Aerial Photography – DJI Mavic Pro
Primary Camera – Blackmagic Pocket Cinema Camera

World’s Lightest Camping Lantern (and cheapest)

Discussing my Favorite (and cheapest) Ultralight Camping Lantern Option.

Just a quick backpacking tips video to highlight a technique that I actually showed briefly in a video years back. I recently read a list of “camping hacks” that mentioned a DIY way to turn your camping headlamp into a lantern. They used a 1 gallon water jug to diffuse the light. Clever, and it probably works well, but it reminded me of my preferred method – simply using a headlamp and a balloon to create a lantern effect.

Surprisingly, I haven’t really seen or heard of hikers doing this very often. Perhaps it’s because it’s just too obvious, but I figured it was worth sharing.

ULA Ohm 2.0 Review – My go-to Pack for Ultralight Backpacking

A Detailed Review of the ULA Ohm 2.0 Backpack.

Specs etc, as per ULA:

Volume Breakdown
Main Body: 2,100 cc
Front Mesh Pocket: 500 cc
Side Pocket: 400 cc each
Ext. Collar: 500 cc
Hipbelt Pockets: 100 cc

General Guidelines
Recommended Maximum Load: 30 lbs or less
Recommended Base Weight: 12 lbs or less

Pack Weight (Torso-M, Hipbelt-M)
32.5 oz (add about 2 oz for camo cordura version)
Weight includes all removable items, which is about 5 oz.

Total Volume
3,960 cu in (about 63 liters)

For more info visit ULA’s official website product page.

Link to my favorite pack cover, seen in the video: Dutchware Argon Pack Cover

Katadyn BeFree Upgrade! – Larger Water Bag & Gravity Filter System

Using the Katadyn BeFree Water Filter with a HydraPak Seeker 2L Reservoir and Gravity Filter Tubing Setup.

After my previous review of the Katadyn BeFree water filter, I discovered and acquired a compatible water reservoir bag that would increase my filtering capacity to 2L – the HydraPak Seeker collapsible water bottle (also available in a 3 liter version).  The main challenge with the BeFree filter is finding a water bottle or reservoir with wide mouth 42mm threads, which the HyrdaPak has.

In the video I go over my thoughts and experiences using the Katadyn BeFree in conjunction with the HydraPak Seeker 2L and Sawyer Squeeze 64 oz Pouch as part of a gravity water filter system, as well as a stand alone squeeze style system using just the HydraPak Seeker and BeFree.

System Components Seen in the Video
Katadyn Befree Water Filter With Hydrapak 0.6L Collapsible Flask
Hydrapak Seeker 2L Water Storage Bag, Mammoth Grey (for dirty water)
Sawyer Inline Adapters for Screw On Filters
1/4″ Food Grade Plastic Tubing
Sawyer Squeeze Bag – 64 oz Pouch (for clean water)

Hiking the Grayson Highlands – Solo Backpacking Trip

Join me for 3 days of Solo Backpacking, Hiking, Hammock Camping, & Wild Ponies on the Appalachian Trail in Virginia’s Grayson Highlands.

For this backpacking trip, I’ll be hiking and camping solo in a section of the Mt Rogers National Recreation Area, within the larger George Washington and Jefferson National Forest.  I’ll be using a portion of the Appalachian Trail to create a 3 day, 2 night backpacking loop of around 20 miles or so.  The Grayson Highlands are known for their high winds and unpredictable, rapidly changing weather, so being that I’m doing the trip in March, I’ll be packing amount of warm weather and rain resistant gear.  If you’re interested in a detailed account of everything that I packed, check out my previous Winter Ultralight Backpacking Gear List blog post and video.  That will give you a look at exactly what I packed for the trip.

Grayson Highlands Backpacking Trip Route Overview – Sintax77

Below is a daily rundown of the trails and campsites used for each day.  Full GPS track data can be found on the Trip Data page.

Parking Location

Grayson Highlands State Park, Overnight Backpacker’s Parking Area at the Massie Gap Parking Lot.  N36° 38.012′ W81° 30.322′

Trails Used, Day 1

  • Depart Massie Gap Parking Lot
  • Rhododendron Trail
  • Appalachian Trail South
  • Wilburn Ridge Trail (it’s also possible to stay on the AT)
  • Rejoin the Appalachian Trail South
  • Setup camp about 200 yards past the Thomas Knob Shelter.

Day 1 Mileage: 4.25 miles
Day 1 Elevation Gain: 2,096′

A spring is about a 100 yards down the trail behind the shelter.

Camping options for tents and hammocks are available a few hundred yards past the shelter, heading south. Tenting spots are on the ridge to the left, hammock camping opportunities are in the trees to the right.

There are also some nice campsite opportunities about a 1/4 mile or so before the shelter as well (AT north from the shelter)

Grayson Highlands Day 1 Elevation Profile – Sintax77

Trails Used, Day 2

  • Continue on the Appalachian Trail South
  • Mt Rogers Trail Towards Grindstone Campground (not to be confused with the Mt
  • Rogers Spur Trail which hits the summit of Mt Rogers.  That trail is available shortly after leaving the campsite.  I’ve heard it doesn’t have any views, but it holds the distinction as Virginia’s highest peak).
  • Lewis Fork Spur Trail (turn here a couple of miles before hitting the campground).
  • Cliffside Trail
  • Crest Trail
  • Scales Trail
  • Setup Camp near the intersection of Scales Trail with the Appalachian Trail

Day 2 Mileage: 11 miles
Day 2 Elevation Gain: 1,320′

There are a number of hammock and tent camping opportunities on the edge of the field opposite from the AT intersection.

There is plenty water in several directions from the intersection. The particular campsite I used (tagged in my GPS data) has water right next to it within 20 yards or so.

Grayson Highlands Day 2 Elevation Profile – Sintax77

Trails Used, Day 3

  • Continue on the Scales Trail South (note: it is possible to continue on the AT
  • South and eventually make your way back to the Massie Gap parking lot as well.  I chose the scales route because it is considerably quicker and I had to do a long drive home upon reaching the lot.)
  • Seed Orchard Trail (this wasn’t on my Nat Geo Map, but after coming out of the woods, you’ll see a sign directing you towards the AT by turning right.  Instead, look left.  You’ll see a water crossing with a brown Grayson Highlands State Park sign listing various rules and regs.  The path along the fence over there is the Seed Orchard Trail)
  • Follow signs towards Hickory Ridge Campground.
  • Past the campground, there will be a large metal gate for a Horse Trail
  • Follow the Horse Trail (there doesn’t seem to be a fancier name for it)
  • Appalachian Spur Trail towards the Backpacker’ s Parking Lot
  • Return the Massie Gap Parking Lot

Day 3 Mileage: 3.5 miles
Day 3 Elevation Gain: 499′

Grayson Highlands Day 1 Elevation Profile – Sintax77


Trip Grand Total Mileage: 18.75 miles
Trip Grand Total Elevation Gain: 3,915′

Map Used for this Trip: National Geographic Map #318, Mt Rogers High Country