Olight HS2 Headlamp for Running & Hiking – Review

A Review of the Olight HS2 Headlamp for Running & Hiking.

In this gear video I go over my personal experiences with using the Olight HS2 rechargeable headlamp system, specs, features, and operational procedures to access the Olight H2R Nova’s light modes and charging functions. As a backpacker more so than a runner, I also go over my thoughts and experiences with using this as a running headlamp vs a hiking and camping headlamp.

HS2 Specs, as per the Manufacturer

  • Beam Distance Max: 279 feet / 85 meters
  • Max Performance (lumens): 400
  • Charge type: Micro-USB
  • Compatible Batteries: Customized LiPo Battery
  • Light Intensity (candela): 1,800
  • Light Form: Wide/broad hotspot. Perfect for up close illumination.
  • Lens / Reflector Type: TIR bead lens (wide/broad beam)
  • Mode Operation: Side Switch
  • Size Factor: Small size (Car key / Zippo Lighter)
  • Series: Series H (Headlamps, Multitasking)

Unique Characteristics

  • Can be powered directly from any USB power source – never run out of battery.
  • Dual LED system for long range and up-close wide illumination.
  • Audible beep at 10% battery capacity to alert the user to charge.
  • Compact and lightweight at only 4 ounces.

Lighting Levels

  • Dual Beam High: 400 lumens , 2 hours 12 minutes
  • Dual Beam Low: 100 lumens , 9 hours
  • Single Beam High (wide or spot): 200 lumens , 4 hours 30 minutes
  • Single Beam Low (wide or spot): 50 lumens , 18 hours
  • Moon 1 lumens Cool White / 1 lumens – Neutral White – 45 days
  • Strobe: No
  • SOS / BEACON: Yes

Technical Characteristics

  • Waterproof: IPX4
  • Weight: 4.06 oz , 115 grams
  • Length: 24mm / 0.94 in
  • Head Diameter:  23mm / 0.91 in
  • Body Diameter: 45mm / 1.77 in
  • LED: Cree XH-G2
  • Use: EDC, car, camping, fishing, household, general use, fishing, climbing, cave exploration, outdoor activities, house activitie

Package Contents

  • Flashlight Olight HS2 x 1
  • Rechargeable  2000mAh 3.7V Lipo x 1
  • head strap x 1
  • Pouch x 1
  • Replacement Cable Clip x 2
  • 1.5-meter Micro-USB Cable
  • instruction manual x 1

Other items Seen / Discussed in the Video

Backpacking Gear for Hammock Camping – Which Items to Buy First?

A discussion on deciding which backpacking gear items to buy / upgrade first when first getting started with hammock camping.

A viewer, Chuck C., recently sent me the following question:

“I have been buying my gear spread out so the wife won’t kill me. Rank these in the order you would buy:

  • Cuben Fiber Tarp
  • Down Under Quilt
  • Down Top Quilt
  • Hammock
  • Backpack

In the video I try to answer this question as well as get some discussion going on the topic of hammock camping gear in general.  Which items would you upgrade or buy first?

Day Hiking w/ the Amok Segl Hammock & General Discussion on Hammock Camping, Set-up, Tips, etc

Day Hiking and trying out the Amok Segl hammock, as well as some general talk about Hammock Setup and Camping vs Lounging on the trail.

Topics Discussed on this Episode

  • A detailed look at the features and setup of my new Amok Segl Hammock.
  • Proper hang angle for hanging a hammock (ideally, 30°) and why you should avoid hanging your hammock suspension too tight / flat.
  • Proper strap position when using carabiners or Dutch Clips.
  • Nylon vs Polyester tree straps
  • Hammock length and how it relates to diagonal lay.
  • What I look for in a camping hammock compared to an on-the-go lounging / sitting hammock.
  • Hammock strap length and why you may or may not pack longer or shorter straps.
  • Fabric differences for hammocks (stretch, texture, water resistance)

Specs and Features of the Amok Segl Hammock, as per the Manufacturer

  • Plug and play suspension system included.
  • Ultralight weight: 15 oz (total)
  • Weight Breakdown – Hammock (7 oz), Suspension straps (5 oz), Carabiners and buckles (3 oz)
  • 20D Robic Nylon (30% stronger than regular nylon)
  • Capacity: 330 lbs

Other gear seen in the video: ULA Ohm 2.0 Pack, Dutchware Half-Wit Hammock, Amok Draumr 3.0 Hammock.

Hiking Big South Fork Pt 1 – Tennessee Hammock Camping & Backpacking Trip

Join me for 3 days of hiking & hammock camping on a backpacking trip in Tennessee’s Big South Fork Nat’l Rec Area.

For this backpacking adventure, I’ll be breaking the hiking trip into two parts. Part 1 is mostly in the woods and at camp and is more of a hanging in the woods, conversational type video. In BSF Part 2 we will traverse into the higher regions of Big South Fork, hitting the ridges for views of the Cumberland Plateau’s sandstone bluffs and Big South Fork River.

GPS Data for this trip is available on the Trip Data Page or by clicking this link for direct download: Big South Fork Backpacking Loop 2017 GPS Data – Sintax77

Trailhead and Parking Location

Bandy Creek Visitor Center, 151 Stable Rd, Oneida, TN 37841
N36° 29.275′ W84° 41.837′

Topics discussed and things that happen in this episode

  • Feeling like a lost idiot on the trail.
  • Camp setup priorities when arriving at camp.
  • Setup / breaking camp in the rain.
  • Continuous Ridgeline usage and setup for quick and easy tarp deployment.
  • Low carb backpacking food options for carb conscious or ketogenic diets.
  • Starting a campfire in the rain.
  • Campfire cooking some meat on a stick.

Trails Used Day 1

  • Parked at the Bandy Creek Visitor Center
  • Started on the Oscar Blevins Farm Loop Trail (located in the corner of the parking lot on the opposite side of the road from the visitor’s center)
  • At the Intersection, turn right onto the Collier Ridge Bike Loop. This is where I mistakenly continued straight, which would have taken in a circle. Luckily, I realized earlier enough to turn around and head back to the intersection.
  • Turn left (north) on the gravel road. From looking at the map, I could have avoided the short road hike by hopping on the access Jack Ridge trail, which appears to be found either right near where I popped out on the road, or a little ways down that road to the right.  Continuing on the road seems to have saved me a decent amount of hiking though, which made up for my wrong turn earlier,
  • Turn right (east) onto the next, smaller gravel road.
  • Arrived at the sign for Jack Ridge Loop Trail and headed left onto
  • Black House Branch Trail
  • Right on Laurel Fork Creek Trail
  • Setup camp by the waterfall pool along the Laurel Fork Creek Trail.

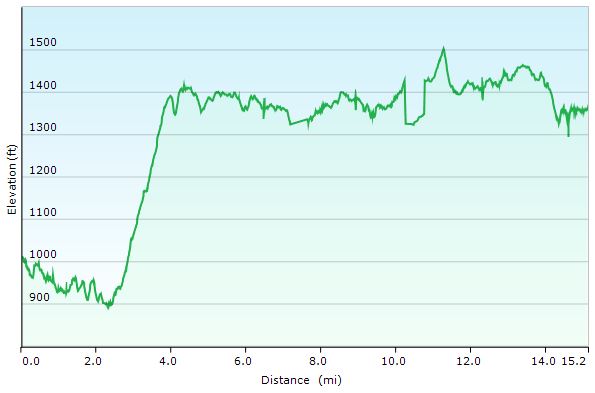
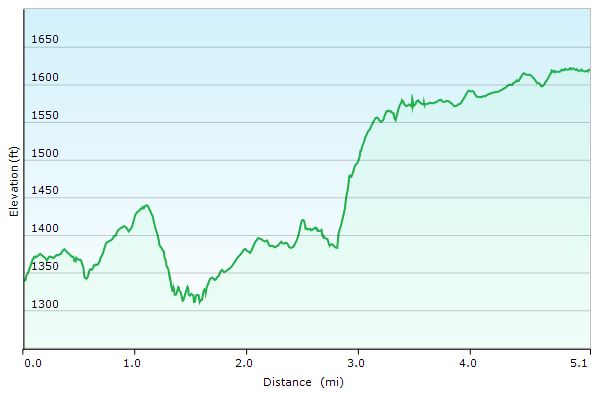
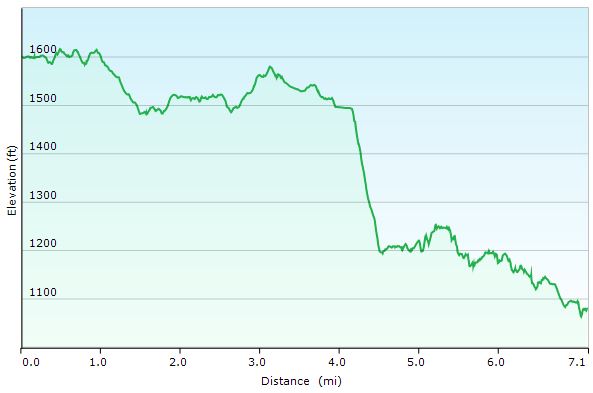
Big South Fork Day 1 Elevation Profile – Sintax77

Day 1 Total Mileage: 7.25 miles
Day 1 Gross Elevation Gain: 860 feet
Day 1 Gross Elevation Loss: 1,256 feet

The gear list used for this trip along with discussion on each item can be found in my accompanying 2017 Ultralight Backpacking Gear List Blog Post and Video.

Ultralight Backpacking Gear List 2017

A detailed look at my 2017 Ultralight Backpacking Gear List (warm weather & 3-season)

For a detailed list of my backpacking gear, with itemized weights and descriptions, you can download PDF and CSV format copies of this list as well as lists for previous trips / videos my Gear Lists page.

Sintax77 Gear List 2017 in PDF Format for viewing and printing.

Sitnax77 Gear List 2017 in CSV Spreadsheet Format for use in your favorite spreadsheet or backpacking software.

Below is a simplified list of the backpacking items shown in the video (without weights or descriptions) along with links for details and current pricing.

Backpack
Backpack – ULA Ohm 2.0
Pack Cover – Dutchware Argon

Shelter
Hammock Body – Dutchware Half-Wit
Hammock Suspension – Dutchware Dyneema Beetle Buckle
Tarp – Hammock Gear Cuben Hex Tarp
Tent spike – Titanium
Ground Cloth – Tyvek, long 3′ 6′ – I forgot to show this in the video. I like to place this under my hammock for organizing gear, keeping my feet dry when changing / getting out of the hammock and for wrapping around my pack to keep it dry during windy rain storms. 4 oz.  A 3’x3′ square can get the job done as well for half the weight.

Sleep System
Under Quilt – Hammock Gear Phoenix 30
Top Quilt – Hammock Gear Burrow 40

Storage
Bear Bag Line – Zing-it rope and Carabiner
Zip-lock Bag – Gallon
Zip-lock Bag – Sandwich

Cooking & Eating Utensils
Cook Pot – Toaks 750ml Titanium
Stove – Esbit DIY (made out of pellet tin)
Cookset Stuff sack (came with Toaks pot)
Matches – Waterproof
Fire Steel – Light My Fire, Mini
Pot Cozy , DIY Reflectix
Spoon – backup, disposable
Spork – Sea to Summit Alloy
Windscreen – Vargo Folding Aluminum
Paper towels squares and Sea to Summit Pocket Soap slivers

Water Treatment & Storage
Water Filter – Katadyn BeFree
Water Bottle – 1.5 Ltr, Disposable (2)
Spare water bottle caps

Tools

Compass – Brunton Classic
Lighter – Eddie Bauer
Multi Tool – Tool Logic Card

First Aid
First Aid Kit
Bug Spray – 100% Deet in a 3ml bottle
Sunscreen – 30 SPF in a 10ml bottle

Clothing (not worn)
Dri Ducks Rain Jacket
Underwear – Synthetic (1 Pair)
Shorts, Synthetic workout style
Shirt, Long Sleeve – light weight synthetic
Shirt, short sleeve synthetic Champion
Hat, Beanie – Lt Wgt Fleece
Socks, Wool – light weight 1/4 Darn Tough

Lighting
Headlamp – Fenix HL21 w/ battery

Toiletries
Toilet Paper
Toiletry Kit
Wet Wipes
Hand Sanitizer

Clothing Worn
Pants, Hiking – Lt Wgt
Shirt, short sleeve synthetic Champion
Underwear – Synthetic
Socks, Wool – light weight 1/4 Darn Tough 
Shoes, Trail Runners – Merrell Moab Ventilator

Optional Items Seen at End of Video
My every day carry flashlight – Preon 2
Long Underwear, Synthetic
Down Jacket – Montbell UL Down Parka
Dri Ducks Rain Pants
Dri Ducks Poncho
Spot Messenger Gen3 GPS Locator

The Backpacking Trip that Never Was – Hiking the Susquehanna River

Getting our Bear Grylls on. Hiking with a full overnight backpacking load-out & zero intention of actually sleeping outside.

When an iffy forecast caused us to cancel an overnight backpacking trip we had planned about four hours from home, we decided at the last minute to still get outside.  Only instead of a full backpacking trip hours from home, we decided to grab our already packed gear and hit a local spot for a day in the woods.  Backpacking meals, hammocks, a tarp in case it rained earlier than expected, etc.  The only thing that wasn’t in our plan was to actually sleep out there.  And then things didn’t go to plan.  Again.

In the end, it was a great, fun day.  Certainly not what we expected, but better than sitting on the couch (well, all day at least).  We got some exercise, Sara had some of our favorite camping foods, and I got to test out some gear and packing techniques.  The moral of the story?  Do weird stuff.  Sometimes it pays off.

Trailhead Parking Location: Rock Run Grist Mill parking area. This is a decent sized parking area by the Rock Run Grist Mill at the intersection of Stafford Rd and Rock Run Road in Susquehanna State Park.

GPS Track Data for this trip can be found on my Trip Data Page.

Total Mileage: 4 miles
Total Elevation Gain: A whopping 225′

Susquehanna River Day Hike Elevation Profile – Sintax77

Notable Gear Used

Packit Gourmet Pico De Gallo salsa and Pasta Bolegnese
Denali’s Dog Backpack – “One Tigris Cotton Canvas Dog Pack”
Denali’s Collapsible Dog Dish – Doggone Dish
Toaks 750ml Titanium Pot
ULA Ohm 2.0 Backpack
Generic Canister Stove
ALLPOWERS 21W Solar Charger
Notch Hat (Classic Multi-cam Operator model)

Aerial Photography – DJI Mavic Pro
Primary Camera – Blackmagic Pocket Cinema Camera