Hammock Camping with my Dog – Seneca Creek Hiking & Backpacking Trip

Join my dog Denali and I for some Hiking, Backpacking, and Hammock Camping in the Seneca Creek Backcountry.

For this hiking adventure, my pup and I will be visiting the Spruce Knob-Seneca Creek National Recreation area, within West Virginia’s greater Monongahela National Forest. Our route will be a “lollipop”style hike – meaning we’ll use an “out and back” section of trail from the Spruce Knob trailhead parking area to connect with a series of other trails that form a loop. After completing the loop portion of the hike, we’ll backtrack out using the same section of trail from day one.

The Spruce Knob-Seneca Creek Backcountry offers around 60 miles of trails (marked with blue blazes) with an elevation range of 3,000 to 4,800 feet above sea level. The beginning of this particular loop is actually the highest point in all of West Virginia – Spruce Knob – standing at and elevation of 4,861 feet. Below is a list of trails for each day, along with stats for elevation gain and mileage.

Trailhead Parking: Spruce Knob Parking area (right by the observation tower).

Parking Notes:  No parking fees or overnight permits are required.  There are restrooms and bear-proof trash bins available for use.

GPS Track Data for this trip can be found on my Trip Data Page.

Trails used, Day 1

  • Huckleberry Trail
  • Hornton Trail (just for a short bit)
  • Judy Springs Trail
  • Seneca Creek Trail
  • Hammock Camp along Seneca Creek.

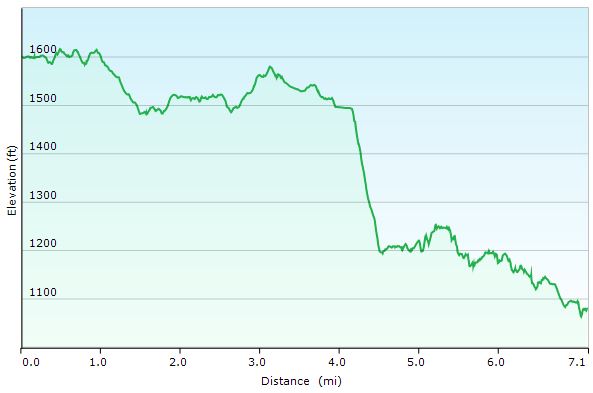
Day 1 – Seneca Creek Loop elevation Profile – Sintax77

Day 1 Mileage: 6.5 miles
Day 1 Gross Elevation Gain:  221 feet (pretty much down hill all day)

Trails used, Day 2

  • Seneca Creek Trail
  • High Meadows Trail
  • Lumberjack Trail
  • Join back up with Huckleberry Trail
  • Arrive back at Spruce Knob Parking Lot

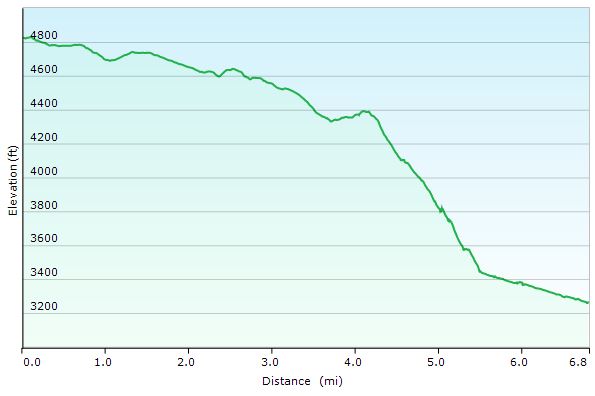
Day 2 – Seneca Creek Loop elevation Profile – Sintax77

Day 2 Mileage: 10 miles
Day 2 Gross Elevation Gain:  2,173 feet (pretty much up hill all day)

Notable Gear Seen in the Video

Denali’s Hammock – 2T’s Hammock Chair from Dutchware
Denali’s Dog Backpack – “One Tigris Cotton Canvas Dog Pack”
Denali’s Collapsible Dog Dish – Doggone Dish
Dutchware Chameleon Hammock
Hammock Gear Burrow 40 Top Quilt

Hammock Gear Phoenix 30 Underquilt
Hammock Gear Cuben Hex Tarp
Katadyn BeFree Water Filter
Toaks 750ml Titanium Pot
Vargo Windscreen
Esbit Solid Fuel Cubes
ULA Ohm 2.0 Backpack

Aerial Photography – DJI Mavic Pro
Primary Camera – Blackmagic Pocket Cinema Camera

Hiking the Grayson Highlands – Solo Backpacking Trip

Join me for 3 days of Solo Backpacking, Hiking, Hammock Camping, & Wild Ponies on the Appalachian Trail in Virginia’s Grayson Highlands.

For this backpacking trip, I’ll be hiking and camping solo in a section of the Mt Rogers National Recreation Area, within the larger George Washington and Jefferson National Forest.  I’ll be using a portion of the Appalachian Trail to create a 3 day, 2 night backpacking loop of around 20 miles or so.  The Grayson Highlands are known for their high winds and unpredictable, rapidly changing weather, so being that I’m doing the trip in March, I’ll be packing amount of warm weather and rain resistant gear.  If you’re interested in a detailed account of everything that I packed, check out my previous Winter Ultralight Backpacking Gear List blog post and video.  That will give you a look at exactly what I packed for the trip.

Grayson Highlands Backpacking Trip Route Overview – Sintax77

Below is a daily rundown of the trails and campsites used for each day.  Full GPS track data can be found on the Trip Data page.

Parking Location

Grayson Highlands State Park, Overnight Backpacker’s Parking Area at the Massie Gap Parking Lot.  N36° 38.012′ W81° 30.322′

Trails Used, Day 1

  • Depart Massie Gap Parking Lot
  • Rhododendron Trail
  • Appalachian Trail South
  • Wilburn Ridge Trail (it’s also possible to stay on the AT)
  • Rejoin the Appalachian Trail South
  • Setup camp about 200 yards past the Thomas Knob Shelter.

Day 1 Mileage: 4.25 miles
Day 1 Elevation Gain: 2,096′

A spring is about a 100 yards down the trail behind the shelter.

Camping options for tents and hammocks are available a few hundred yards past the shelter, heading south. Tenting spots are on the ridge to the left, hammock camping opportunities are in the trees to the right.

There are also some nice campsite opportunities about a 1/4 mile or so before the shelter as well (AT north from the shelter)

Grayson Highlands Day 1 Elevation Profile – Sintax77

Trails Used, Day 2

  • Continue on the Appalachian Trail South
  • Mt Rogers Trail Towards Grindstone Campground (not to be confused with the Mt
  • Rogers Spur Trail which hits the summit of Mt Rogers.  That trail is available shortly after leaving the campsite.  I’ve heard it doesn’t have any views, but it holds the distinction as Virginia’s highest peak).
  • Lewis Fork Spur Trail (turn here a couple of miles before hitting the campground).
  • Cliffside Trail
  • Crest Trail
  • Scales Trail
  • Setup Camp near the intersection of Scales Trail with the Appalachian Trail

Day 2 Mileage: 11 miles
Day 2 Elevation Gain: 1,320′

There are a number of hammock and tent camping opportunities on the edge of the field opposite from the AT intersection.

There is plenty water in several directions from the intersection. The particular campsite I used (tagged in my GPS data) has water right next to it within 20 yards or so.

Grayson Highlands Day 2 Elevation Profile – Sintax77

Trails Used, Day 3

  • Continue on the Scales Trail South (note: it is possible to continue on the AT
  • South and eventually make your way back to the Massie Gap parking lot as well.  I chose the scales route because it is considerably quicker and I had to do a long drive home upon reaching the lot.)
  • Seed Orchard Trail (this wasn’t on my Nat Geo Map, but after coming out of the woods, you’ll see a sign directing you towards the AT by turning right.  Instead, look left.  You’ll see a water crossing with a brown Grayson Highlands State Park sign listing various rules and regs.  The path along the fence over there is the Seed Orchard Trail)
  • Follow signs towards Hickory Ridge Campground.
  • Past the campground, there will be a large metal gate for a Horse Trail
  • Follow the Horse Trail (there doesn’t seem to be a fancier name for it)
  • Appalachian Spur Trail towards the Backpacker’ s Parking Lot
  • Return the Massie Gap Parking Lot

Day 3 Mileage: 3.5 miles
Day 3 Elevation Gain: 499′

Grayson Highlands Day 1 Elevation Profile – Sintax77


Trip Grand Total Mileage: 18.75 miles
Trip Grand Total Elevation Gain: 3,915′

Map Used for this Trip: National Geographic Map #318, Mt Rogers High Country

Dutchware Double Chameleon Hammock & Spreader Bar System

Hanging Two Hammocks & One tarp on a single set of Trees using the Dutch Chameleon Hammock with Beetle Buckles and Spreader Bar.

Click here to visit the Dutchware Chameleon Kickstarter Page 

For this video, Sara and I will be experimenting with our new double hammock system by Dutchware to hang both of our hammocks side by side without the need to find 3 or even 4 trees in order to set up without having the two hammocks bump into each other.

The key pieces of hardware that make this possible are the Dutchware Spreader Bar pole with end pins that lock into the holes on the new Dutchware Beetle Buckles suspension system.  When attached at the head end, the spreader bar will keep the two hammocks at a comfortable distance apart.  For the video, we’ll be using a 36 inch spreader bar pole, shorter poles can be used as well, or you can even cut down your existing poles to shorter lengths.  This can help minimize see-sawing, as well as create opportunities to use narrower tarps.

Speaking of tarps, one of the very attractive points of using this system is the ability to pack just a single tarp to be shared by two hammocks.  However, you’ll have to keep in mind that you’re required space will be a bit wider than usual.  This is especially compounded by non-rectangular tarps, such as those cut in the popular hexagonal shape.  Because tarps of those kind are only at their full length along the middle seam, you may find that you’re hammocks don’t quite fit underneath anymore, due to the tapered sides of the tarp.  My 10’x12 Hennessy Deluxe Hex Tarp is a hexagonal cut and suffered this symptom.  For future trips, I may experiment with a narrower spreader bar, or I may just get a dedicated rectangle shaped tarp for use with this hammock system.

Link to Sara’s Instagram: @SarasGreatAdventures , as mentioned in the video.

Dutchware Chameleon Hammock – Up CLOSE detailed look

A close up look at the Dutchware Chameleon dual hammock system.  On kickstarter now.  Field test to follow in part two.

Click here to visit the Dutchware Chameleon Kickstarter Page 

Hammock Length:  11 foot for flatter diagonal lay.
Hammock Width: 58 inches

In the video I’ll give a close up table top look at all of the components of the Chameleon hammock.  The Chameleon is a modular hammock system, allowing customization depending on specific needs such as lay direction, top coverage (bug-net, sold winter over-cover, or netless) and various storage accessories.

The feature that interests me the most though, is this hammock’s ability to be set up with two hammocks connected to the same single set of trees, using an aluminum spreader bar combined with Dutch’s new Beetle Buckle suspension system.  This could come in particularly handy for hammock camping trips with my wife.  Stay tuned for the field review!

Product overview from Dutch

“The Chameleon is a full-featured hammock designed from the ground up. Each of the components that go into the Chameleon have been developed by us to create a versatile and modular light weight hammock that adapts to its environment. Because you can remove and change out components, the Chameleon will be the only hammock you will ever need.”

Link to Shug’s video that I mentioned: A Peek at the Dutchware Chameleon Hammock

Link to Sara’s Instagram: @SarasGreatAdventures , as mentioned in the video.

That Time I Hiked with a Broken Face – Backpacking the Great Gulf Wilderness

Join TJ & I for 3 days of hiking, camping & backpacking in New Hampshire’s Great Gulf Wilderness.  Oh, & I also fall on my face.  

For this adventure, we’ll be revisiting an attempt at a hike that I originally did as a solo backpacking trip a few years back.  A rather aggressive loop, chalking up 30+ miles and over 15,000 feet gross elevation gain, the plan was to give it another go while giving TJ an ultimate sampler platter of the White Mountains.  As fate would have it, things would corkscrew towards another outcome…

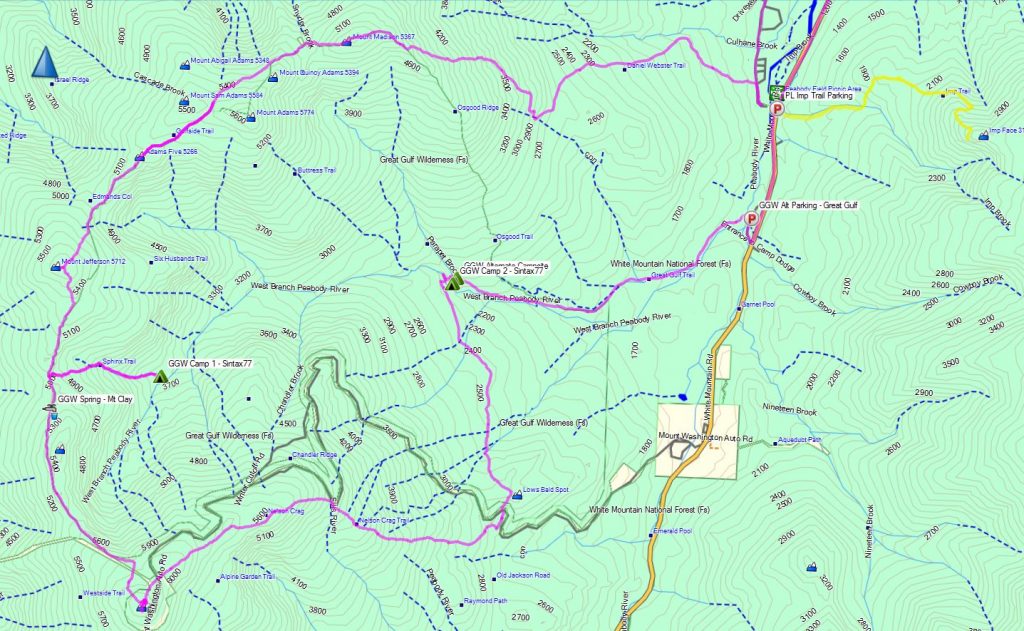
Great Gulf Loop Route Overview - Sintax77

Great Gulf Loop Route Overview – Sintax77

Trailhead Used: Imp Trailhead on Rt 16 – N44° 19.408′ W71° 13.016′

Full GPS track data and waypoints for various POI’s on this trip are available for download on the Trip Data Page.

Trails Used, Day 1 (in order)
Road hike north on Rt 16 to Dolly Copp Campground
Daniel Webster Scout Trail
Appalachian Trail South
Sphinx Trail
Camp along Sphinx Trail, just before junction with Great Gulf Trail

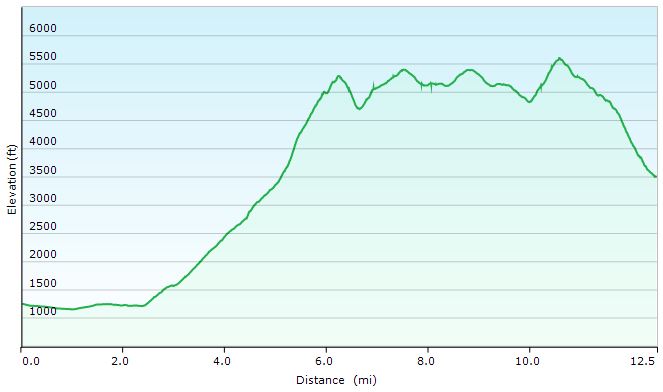
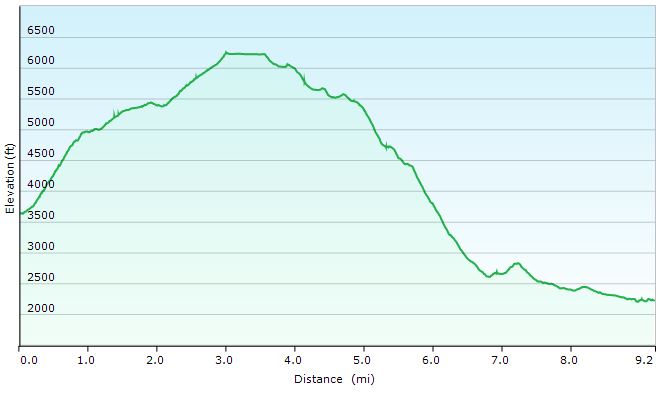
Great Gulf Loop Day 1 Elevation Profile - Sintax77

Great Gulf Loop Day 1 Elevation Profile – Sintax77

Day 1 Mileage: 12.5 miles
Day 1 Gross Elevation Gain: 6,661′

Trails Used, Day 2 (in order)
Double back on Sphinx Trail
Appalachian Trail South
Trinity Heights Connector to Summit of Mt Washington
Have a Chili Dog at the Summit
Nelson Crag Trail
Appalachian Trail South
Great Gulf Trail
Camp near Gulf Trail along ridge

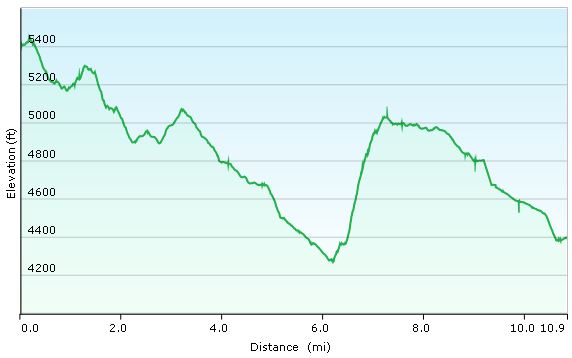
Great Gulf Loop Day 2 Elevation Profile - Sintax77

Great Gulf Loop Day 2 Elevation Profile – Sintax77

Day 2 Mileage: 9.2 miles
Day 2 Gross Elevation Gain: 3,658′

Trails Used, Day 3 (in order)
Great Gulf Trail
Short road hike back to car parked at Imp Trail Head

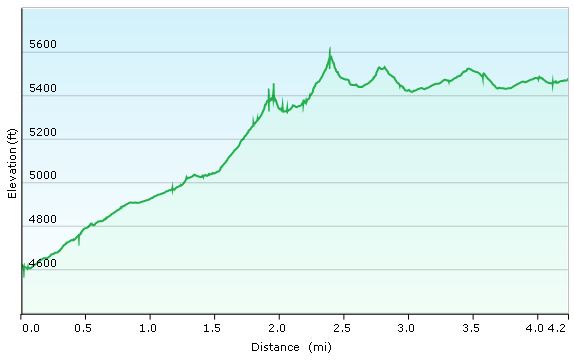
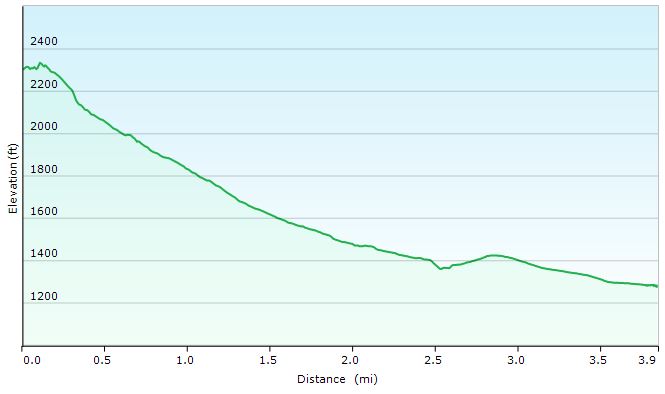
Great Gulf Loop Day 3 Elevation Profile - Sintax77

Great Gulf Loop Day 3 Elevation Profile – Sintax77

Day 3 Mileage: 3.9
Day 3 Gross Elevation Gain: 108′


Mileage Grand Total for Trip: 25.6
Gross Elevation Gain Grand Total for Trip: 10,319′

Maroon Bells Pt 2 – The Hike! – Backpacking in Colorado

Join Mike & I on Colorado’s Four Pass Loop for 3 days of hiking, backpacking & hammock camping.

For this multi-part adventure, we’ll be faced with two challenges.

Phase 1 (seen in the prior Pt 1 video): Driving on a substantial time crunch from the east coast to Colorado, without any hotels or road food purchases.  This will not only keep the budget low, but will also save us a ton of time by not having to check-in/out, be tempted to sleep in, decide where/what to eat, stand in lines etc.  Sleeping will be done in the car (while the other person drives) and all meals will be comprised of cooler-stored left-overs and pre-purchased beverages.  The only stops allowed: bathroom breaks and gas pumps.

Phase 2 (covered in this video, Pt 2) will be a multi-day hike of the Four Pass Loop, within the Maroon Bells Snowmass Wilderness, located just outside of Aspen Colorado (about 3 hours west of Denver).  We chose to do the loop in a counter-clockwise direction.

Trailhead Used: Maroon Bells Snowmass Wilderness Trailhead N39° 05.979′ W106° 56.260′

Full GPS track data and waypoints for various POI’s on this trip are available for download on the Trip Data Page.

Trails Used, Day 1 (in order)
Maroon Snowmass Trail
Camp near Snowmass Lake

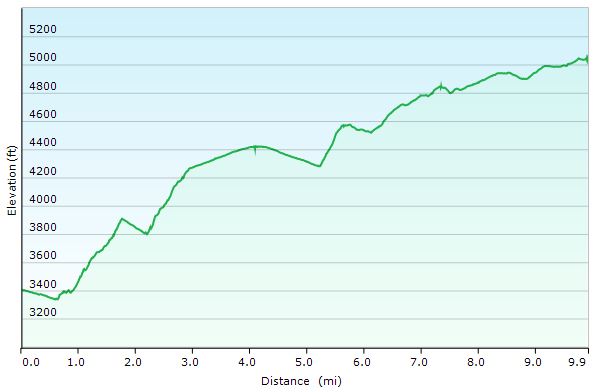
Maroon Bells Day 1 Elevation Profile - Sintax77

Maroon Bells Day 1 Elevation Profile – Sintax77

Day 1 Mileage: 9 miles
Day 1 Gross Elevation Gain: 3,202′

Trails Used, Day 2 (in order)
Geneva Lake Trail
North Fork Cutoff Trail
North Fork Trail
West Maroon Pass Trail
Camp near West Maroon Pass Trail

Maroon Bells Day 2 Elevation Profile - Sintax77

Maroon Bells Day 2 Elevation Profile – Sintax77

Day 2 Mileage: 15 miles
Day 2 Gross Elevation Gain: 4,488′

Trails Used, Day 3 (in order)
West Maroon Pass Trail
Maroon Snowmass Trail
Return to vehicle at Maroon Snowmass Trailhead

Maroon Bells Day 3 Elevation Profile - Sintax77

Maroon Bells Day 3 Elevation Profile – Sintax77

Day 3 Mileage: 4.8
Day 3 Gross Elevation Gain: 305′


Mileage Grand Total for Trip: 28.8
Gross Elevation Gain Grand Total for Trip: 7,995′