The MalloMe Cookware set is a 10 piece nesting mess kit for backpacking and camping that I’ve had for about year now, with great results.
While I typically pack pretty minimal for my solo backpacking trips, for group backpacking trips and snow melting in the winter, I’ve grown to really like this budget mess kit. It’s also quite nice for more involved backpacking meals and trail food cooking.
Join me for 3 days of Hiking, Hammock Camping & Backpacking along the Appalachian Trail in North Carolina’s Nantahala National Forest.
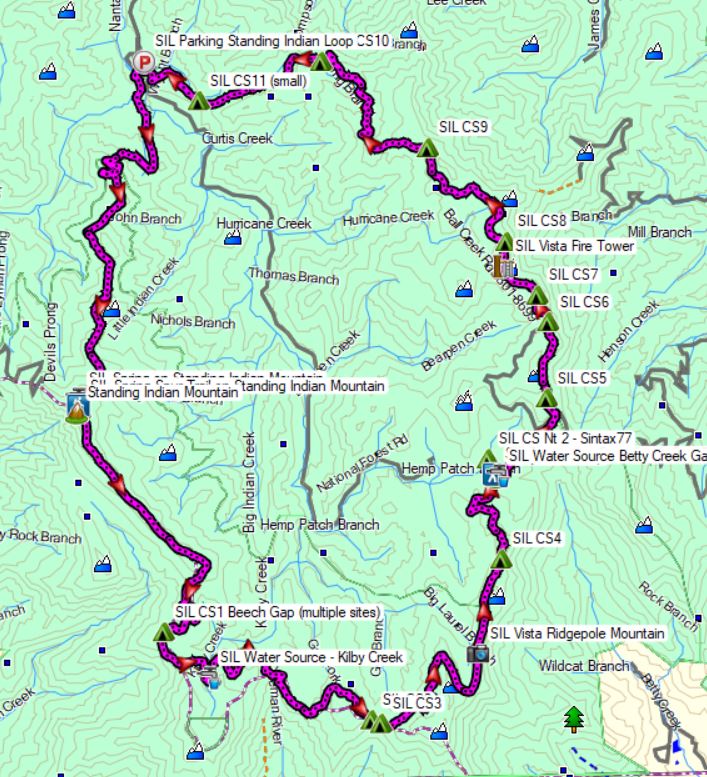
For this backpacking trip, I’ll be doing a 3 day, 2 night hammock camping trip on the Standing Indian Loop in North Carolina’s Nanatahala National Forest. The Standing Indian Loop is a 24 mile loop with a total elevation gain of 4,672′. The loop is made using a portion of the white blazed Appalachian Trail along with the blue blazed Lower Ridge Trail and Long Branch Trail. Campsites and water sources are plentiful on this loop, although many of the campsites are not located along water, so plan accordingly. In my case, I chose two campsites that did have nearby water sources, for added convenience.
Route Overview – Standing Indian Loop – Sintax77
GPS Data for this trip and many others can be found on my Trip Data Page. Includes full track data for each day, and way-points for campsites used / observed along the loop.
Gear Lists for this trip and others can be found on my Gear Lists Page or by using the links below.
Trailhead Used: Standing Indian Campground Information Area – N35° 04.570′ W83° 31.707′ Just up the road from the Standing Indian Campground (car and RV camping), the information area permits overnight parking with spaces available for a half dozen cars or so.
Trails Used, Day 1
Park at the Backcountry Information area, just up the road from Standing Indian Campground. Overnight parking for a half dozen cars or so available at the Info Center, just up the road from the main Standing Indian Campground area. (Overnight parking not available at the actual car camping area)
Lower Ridge Trail (located just behind the bulletin board)
Arrive at intersection with the Appalachian Trail, near summit of Standing Indian Mountain
Setup camp This area has multiple campsite options spread of a large area. A blue blazed spur trail departs the AT near the intersection and leads to a piped spring water source.
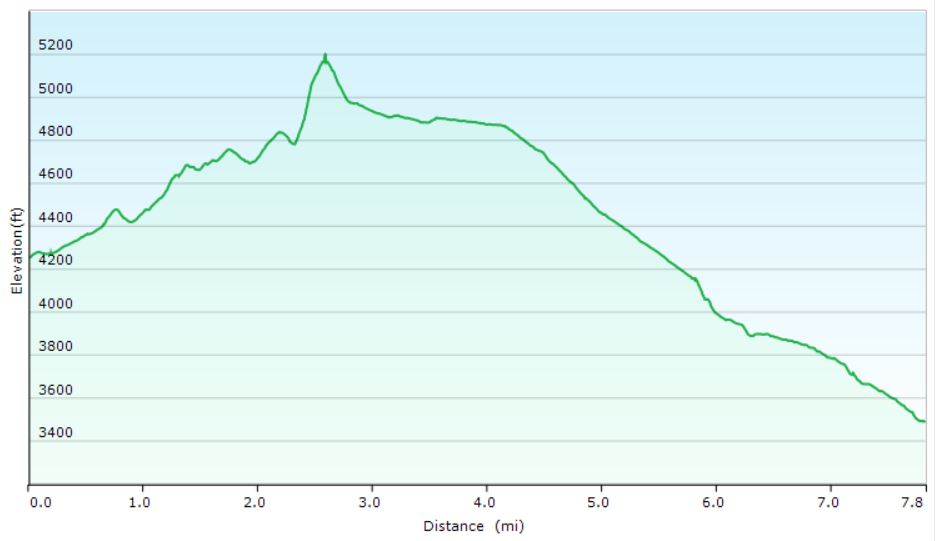
Day 1 Elevation Profile – Standing Indian Loop – Sintax77
Day 1 Mileage: 5 miles Day 1 Gross Elevation Gain: 2,113′
Trails Used, Day 2
Head out Northbound on the Appalachian Trail (away from the spring spur trail) Note: In the video I state on this morning that I was on the Appalachian Trail South. That was incorrect. The AT winds around a bit in this area, and while my compass heading was indeed south, I was actually on the Appalachian Trail North. Arrive at Betty Creek Gap and the depart the Appalachian Trail North on the
Blue Blazed Spur trail to legal camping. While you will notice established campsites directly on the AT at Betty Creek Gap, a sign indicates that camping is currently not permitted in the area for restoration purposes. Setup camp along the water at the end of the blue blazed Betty Creek Gap Spur Trail. There are several campsites of varying size near the water. If they are taken – cross the water and continue about 30 yards to the gravel forest road. After crossing the road, you will immediately see more camping options in the woods beyond the road.
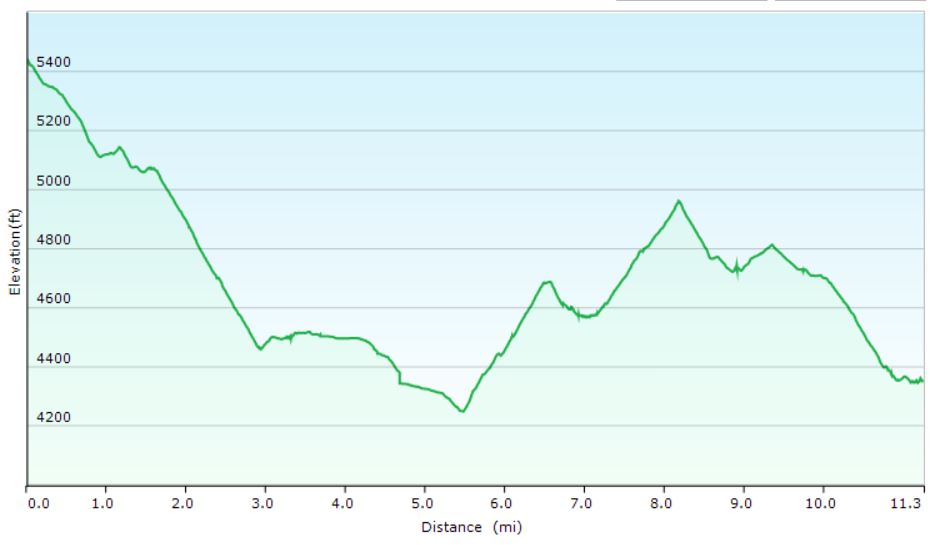
Day 2 Elevation Profile – Standing Indian Loop – Sintax77
Day 2 Mileage: 11 miles Day 2 Gross Elevation Gain: 1,332′
Trails used. Day 3
Backtrack on the blue blazed Betty Creek Spur Trail to the AT intersection from yesterday.
Continue on the Appalachian Trail North.
Catch some views at the Albert Mountain Firetower (located directly on the AT)
Continue on the Appalachian Trail North
At the intersection, take the Long Branch Trail downhill, away from the AT.
Arrive back at the Backcountry Information Area.
Day 3 Elevation Profile – Standing Indian Loop – Sintax77
Day 3 Mileage: 8 miles Day 3 Gross Elevation Gain: 1,227′
Disclosure: A commission is received for purchases through the above product links. Your support is appreciated and makes the backpacking trip videos on this channel possible.
By the way, don’t mistake my giving you a 10% off code as some sort of order to do something. Be a smart cookie. Do your own research. Duh. 😉
Join me for 3 days of Hiking, Hammock Camping & Backpacking on Pennsylvania’s Black Forest Trail.
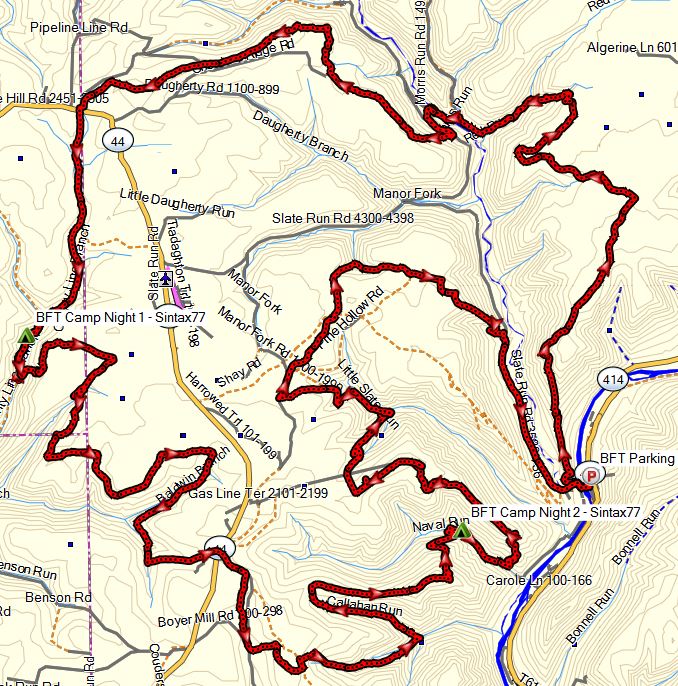
For this adventure, I’ll be doing a 3 day, 2 night solo backpacking trip in Pennsylvania’s Tiadaghton State Forest. The Black Forest Trail is a 42 – 43 mile loop (depending on where you park and start from) with a total elevation gain of 8,550′.
Black Forest Trail Route Overview – Sintax77
GPS Data for this trip and many others can be found on my Trip Data Page. Includes full track data for each day, and way-points for campsites used / observed along the loop.
I also highly recommend the Black Forest Trail Guidebook and Map. I found the mile by mile information provided and overall quality to be great and very helpful.
Trailhead Used: Pine Creek Rail Trail Access Area behind Wolfe’s General Store – 41°28’15.6″N 77°30’05.8″W Trailhead is on the other side of the auto bridge, behind the Hotel Manor inn / pub. Parking immediately at the trailhead is for day use only. No overnight parking is permitted in the hotel’s parking lot by the actual trailhead.
Black Forest Trail Full Loop Elevation Profile
Day 1
Park at the Slate Run Rail Trail parking lot
Head over the auto bridge and make a right.
Begin the loop at the Black Forest Trailhead, located in the lot behind Hotel Manor.
Head Counter Clockwise on the Black Forest Trail
Setup camp at an unestablished spot about a quarter mile past the crossing of Dyer Branch
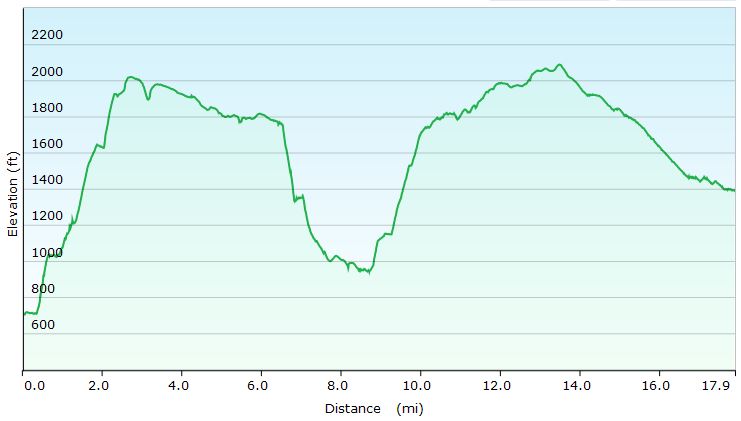
Black Forest Trail Day 1 Elevation Profile- Sintax77
Day 1 Mileage: 16 miles Day 1 Gross Elevation Gain: 2,989′
Day 2
Continue Counter-Clockwise on the Black Forest Trail
Setup camp at an establish spot along Naval Run creek.
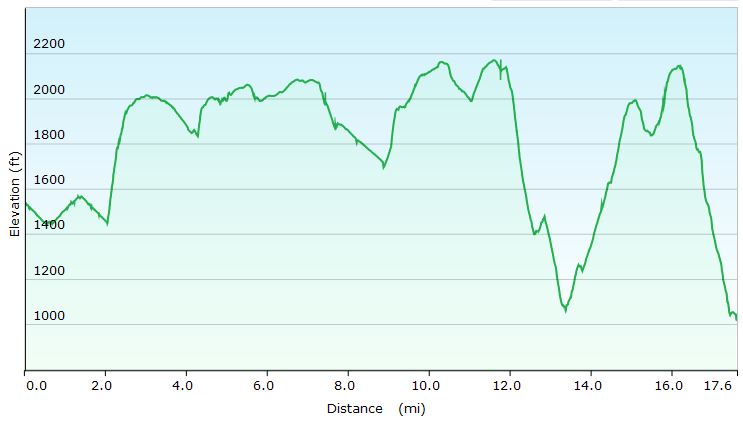
Black Forest Trail Day 2 Elevation Profile- Sintax77
Day 2 Mileage: 15 miles Day 2 Gross Elevation Gain: 3,182′
Day 3
Continue Counter-Clockwise in the Black Forest Trail
Return to the Slate Run Rail Trail Recreation Area Parking Lot
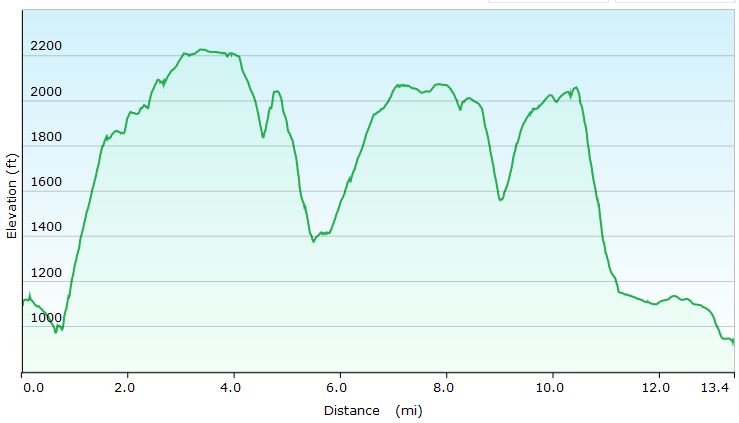
Black Forest Trail Day 3 Elevation Profile- Sintax77
Day 3 Mileage: 13 Day 3 Gross Elevation Gain: 2,953′
For this load-out, I wanted to create a kit that was not only light and concise, but would appear outwardly as a “regular backpack” for an upcoming stealth camping trip. Stealth camping is a term that can elicit a lot of definitions and responses from hikers. At the very least, the common thread seems to be camping overnight in a way that leaves no visual impact. For some this is simply for purposes of immersion in the outdoors (both for themselves and for others in the area). For others, the term refers to camping illegally and / or without permission. I am not advocating the latter. I like to experiment with backpacking load-outs and scenarios, so for me this kit was just a fun way to challenge myself. Regardless, do with the information what you will.
Do to the size constraints of my “regular size” pack, the primary challenge for this kit was not necessarily weight, but volume. Compactness superseded weight and price. These volume constraints created an advantageous by product – my pack’s base weight came in at under 9lbs. My lightest backpacking gear list weight yet.
This kit is intended for a warm weather backpacking trip. Because of this, you’ll notice that the clothing options are limited. Perhaps someday I’ll attempt to devise a winter stealth camping load-out. One step at a time. For instance there is no down jacket. In it’s place is a simple light weight long sleeve shirt. Many of you will also notice that there isn’t any rain gear either. I’m fine with getting rained on in warm weather. My synthetic clothes will dry quickly and the effects won’t be life critical for my expected conditions. Besides, I mostly use my Frogg Toggs rain parka not for rain, but as an ultralight windbreaker for supplemental warmth. Something I don’t expect to need for my upcoming trip. Plan and adjust for your own load-outs accordingly.


 . I found the mile by mile information provided and overall quality to be great and very helpful.
 guy lines


 Fire Starter Tablets
 Bug Repellent
 Sleeping Pad
 GPS Unit
 Flashlight