Unigear Sleeping Pad Review – Budget Backpacking Gear

A Review of the Unigear Inflatable Sleeping Pad.

In this camping gear review, I give a run down of the various features of the Unigear Sleeping pad, as well as my own personal experiences with the Unigear pad for backpacking.

Sintax77 Viewers Get 20% off by using this link and entering the code 20sintax77 (offer good through the end of October, 2018)

Disclosure: This post or video contains affiliate links, which means I may receive a commission for purchases made through my links. Cross reference, do your own research and make your own decisions, duh 😉

Specs and Features as per the manufacturer

  • Comfortable & Stability: The sleeping pad’s wave air tubes support your weight, keep you comfortably cradled in the middle of the pad, you won’t bottom out if you roll on your side. 2 Inch thickness of cushioning provide unrivaled comfort, stability and support, great for sleeping in any position
  • Durability & Warm: The durable 40-denier ripstop nylon polyester with TPU coating helps prevent tearing, offers the right balance between low weight and durability. You don’t need to worry about punctures or leaks. Thickness material limit heat loss for better support and warmth (R-value 1.3)
  • Ultralight & Ultra-compact: Unigear sleeping pad with ultralight weight(Only 507g/1.1lb) and compact packed to the size of a 1-liter water bottle, Inflated size is 74”x24”x2”, which is ideal for outdoor activity like fast-and-light backpacking, traveling or camping
  • Easy to Inflate & Deflate: This sleeping mat with one way valves for inflation and deflation, blowing air into this inflatable sleeping pad really is a breeze! Which allows quick to inflate (10-15 breaths) and super fast deflate(only one second). Includes repair kit with 4 self-adhesive patches for fixing punctures in the field
  • 100% SATISFATION GUARANTEE: If you are not 100% satisfied with this product for any reason, please contact customer service within 60 days, and we will immediately refund your purchase price – no questions asked

Other Gear Seen and Discussed

Vermont Long Trail Section Hike – Camping at Stark’s Nest

Section Hiking on the Vermont Long Trail – Appalachian Gap to Lincoln Gap.

For this backpacking trip, my dog Denali and I will be doing a 2 day, 1 night camping trip in Northern Vermont.  The specific area we’ll be camping near is called the Stark’s Nest, which lies on a section of the Long Trail between Appalachian Gap and Lincoln Gap, about 40 minutes west of Montpelier, VT.

As seen in the video, use this link to get your free camping pillow from Outdoor Vitals for a limited time.

The Vermont Long Trail is a 273 mile, long distance hiking trail that runs the entire length of Vermont, from the sothern border with Massachusetts all the way up to the Canadian border to the north.  The first hundred miles or so in the south coincide with the Appalachian Trail as well.  I’ll be backpacking and camping just a short taste of the Long Trail – a roughly 8 mile section in the North Country of Vermont on a combination of private land and Vermont’s Green Mountain National Forest.

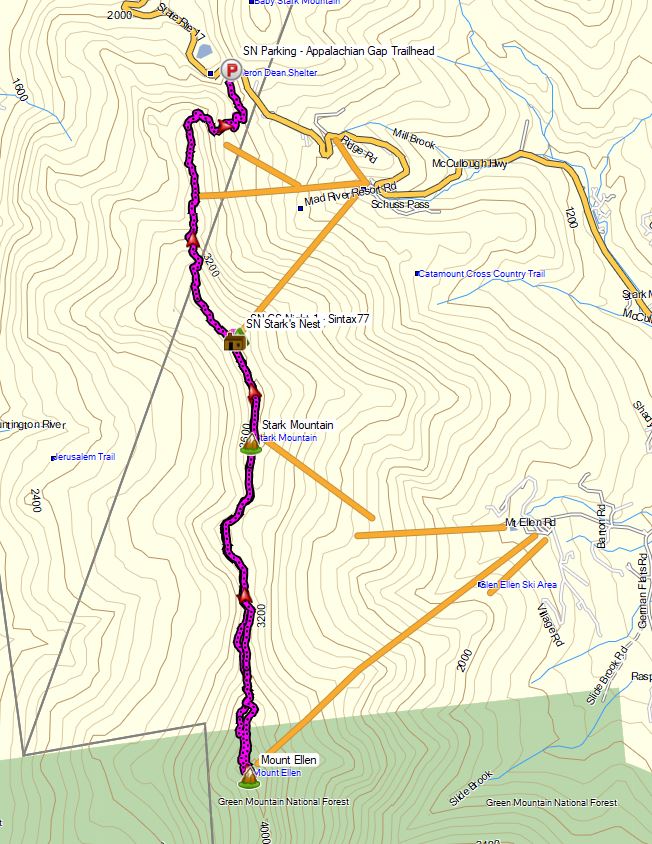
Starks Nest Hike – Route Overview – Sintax77

GPS Data for this trip and many others can be found on my Trip Data Page.  Includes full track data for each day, and way-points for campsites used, water sources, etc.

Trailhead Used: Appalachian Gap Trailhead Parking Area  – 44°12’39.7″N 72°55’53.5″W
This is a large, paved parking area just off of Vermont SR17.  The Vermont Long Trail South (which I took in the video) can be found on the opposite side of the road.  The Long Trail North (which I didn’t take) is located right in the corner of the lot, by the guard rail.

Trails Used & Itinerary, Day 1

  • Park at the Appalachian Gap Trailhead Parking Area
  • Take the Vermont Long Trail South (located on the other side of the road. Look for the white blaze
  • Arrive at Stark’s Nest warming hut and grab some water from the rain barrel.
    Note: Stark’s Nest is a ski warming hut. During the winter, this is a hut used to take a break and warm up in between ski runs at Mad River Glen Ski Resort. While this is private property, it is kept open and available to hikers year round as a place to take a break, or camp for the night while hiking the Vermont Long Trail. There is a rain barrel out front that makes for an excellent water source. It’s essentially a fully enclosed cabin that makes it a great option for riding out storms and bad weather. There is a composting outhouse nearby, across from the cabin in the woods opposite the cabin.
  • Set up camp a little ways down the ski slope near Stark’s Nest

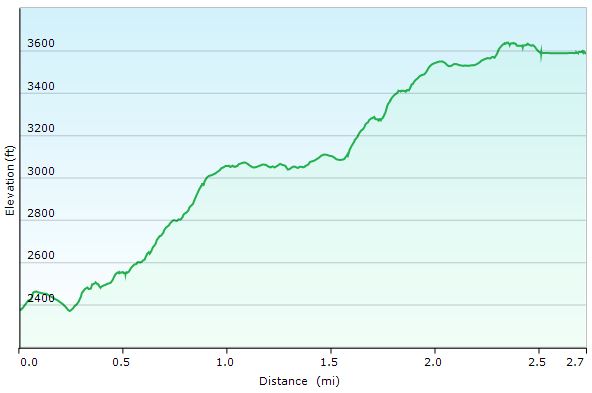
Starks Nest Hike Day 1 – Elevation Profile

Day 1 Mileage: 3 miles
Day 1 Gross Elevation Gain: 1,501′
Day 1 Gross Elevation Descent: 283′

Trails Used, Itinerary Day 2

  • Leave camp and head back uphill to the Stark’s Nest.
  • Continue south on the Vermont Long Trail.
  • End at the ski lift area on Mt Ellen for a break and some views.
  • Backtrack out the way you came, via the Long Trail North.
  • Arrive back at the Stark’s Nest.
  • Breakdown camp, pack up and replenish water supplies.
  • Backtrack out on the Vermont Long Trail North.
  • Arrive back at the Appalachian Gap Trailhead Parking area.

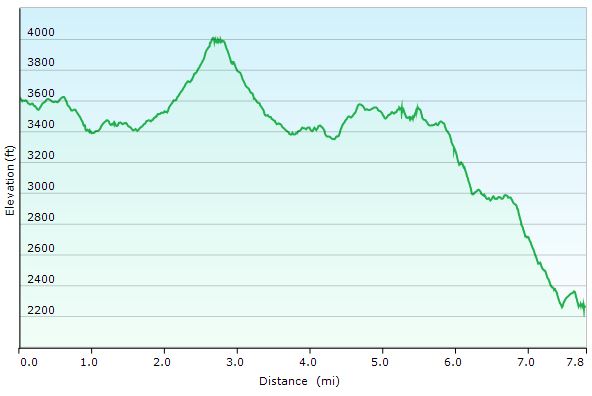
Starks Nest Hike Day 2 – Elevation Profile

Day 2 Mileage: 8 miles (5 round-trip for Mt Ellen, 3 for the hike out from Stark’s Nest)
Day 2 Gross Elevation Gain: 1,566′
Day 2 Gross Elevation Descent: 2,919′

Trip Totals
Grand Total Mileage: 11 Miles
Grand Total Elevation Gain: 3,067′

Notable Backpacking Gear Seen & Used

Notable Dog Backpacking Gear Seen & Used

Hiking Zion National Park – Camping & Backpacking in Southern Utah

Come along for 5 days of Hiking, Camping & Backpacking in Southern Utah’s Zion National Park.

For this adventure, I’ll be spending 5 days exploring Zion National Park with my friends Derrick, Dave, and Tayson from Outdoor Vitals and Randy from Outdoor.Detour on Instagram.  We’ll be doing 3 different backpacking / camping trips: A backcountry West Rim Backpacking Trip, Exploring & hiking the Frontcountry Zion National Park area while car camping in Springdale, Utah, and a backcountry camping trip on a top-down Narrows hike, ending at the Zion visitor’s center back in Springdale.

Note: All backcountry camping in Zion requires a permit. For details, visit the Zion NPS website.

Limited time offer from Outdoor VitalsGet the camping pillow I’m using in this video for FREE by clicking here.

Objective #1: Backcountry camp on Zion Canyon’s West Rim

Trailhead Used: West Rim Trailhead, Near Lava Point Overlook.
GPS coordinates N37° 22.899′ W113° 01.370′

West Rim Itinerary, Day 1

  • Park at the West Rim Trailhead parking area on the dirt service road near Lava Point.
    This is a gravel lot with parking for at least a half dozen cars or so.  It’s about a 40 minute drive from Springdale, Utah. The latter part of the drive is on a dirt road, but non 4wd vehicles should be fine with a bit of care.
  • Head south on the West Rim Trail
  • Setup Camp at West Rim campsite #4 GPS N37° 17.144′ W112° 59.030′

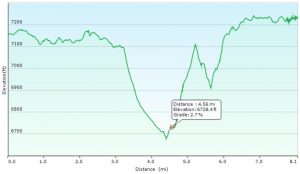
West Rim Hike Elevation Profile- Sintax77

West Rim Hike-In Mileage: 8 miles
West Rim Hike-In Gross Elevation Gain: 1,073

West Rim Itinerary, Day 2

  • Backtrack north on the West Rim Trail
  • Return to the trailhead parking lot near Lava Point.
  • Ghost town pit-stop in Grafton, Utah
  • Continue on to Springdale, Utah.
  • Check into the Quality Inn campground in Springdale, within walking distance of the Zion visitor center and park entrance.
  • Have some tacos at the Whiptail Grill, right next door to the campground. I got the “Fire Asada” tacos and they were great. If you like spicy food that’s actually spicy, I would highly recommend the Whiptail Grill. Heck, even if you don’t like spicy stuff – they have milder options, plus a fun & unique casual atmosphere as well. Oh, and the view is amazing too 🙂

Objective #2: Explore Zion National Park’s Frontcountry & Springdale, Utah.

Zion Frontcountry / Springdale Itinerary. Day 1

  • Wake up at the car campground in Springdale,
  • Take the free Zion shuttle, or a short walk north to the Zion National Park visitor center / entrance.
  • Take the Zion NP bus from the visitor center to Big Bend.
  • From the Big Bend bus stop, take the trail south along the Virgin River to Weeping Rock.
  • Road hike a bit along the Mount Carmel Highway to soak in the sights.
  • Hop another free Zion bus back towards the Springdale Visitor Center.
  • Explore Springdale, eat some ice cream at the Zion Candy Company on Zion Park Blvd.

Objective #3: Hike and Backcountry Camp the Narrows, from the Top Down.

Trailhead Used: Chamberlain’s Ranch Trailhead (aka Zion Narrows Upper Trailhead), Duck Creek Village, UT
GPS Coordinates N37° 23.121′ W112° 50.339′
Note: This was an end-to-end hike that required us to park a second vehicle at the Zion visitor center in Springdale to use as a shuttle back to the starting point.  The drive from the visitor center back to the Chamberlain’s Ranch Trailhead is around 80 minutes.

Zion NP – The Narrows, Top-down Hike Itinerary, Day 1

  • Park at the Narrows Upper Trailhead in Duck Creek, UT.
  • Head southwest on the trail, which is actually dirt road, closed off to vehicles, for the first 3 miles.
  • Continue to follow the trail along the Virgin River, through the Narrows.
  • This trail is very easy to follow, as it is literally the river. A majority of the time will be spent walking in the river bed in ankle deep to knee deep water depending on conditions, depending on current water-flow conditions.
  • Note for reference: The ccf reading during our trip was roughly 40 CCF.  Anything under 50 ccf is considered to be relatively ideal. Above 100 cfs, conditions can be difficult and hazardous. At 130 ccf, top-down narrows hikes will be closed. At 150 ccf, bottom up Narrows hikes will be closed.  During a flash flood, flows can exceed 1000 cfs.
  • Setup camp at the Narrows campsite #12.  N37° 19.982′ W112° 57.373′

Zion NP – The Narrows, Top-down Hike Itinerary, Day 2

  • Break camp and continue south along the Virgin River.
  • Exit the trail and catch the free Zion bus at the Temple of Sinawava shuttle stop.
  • Return to the Zion NP Springdale Visitor Center
  • Drive back to retrieve starting vehicle (~80 minute drive)

Notable Gear Seen:

Mail Call – Back from Zion NP, Alcohol Stove Mods, Backpacking Pillows

Tips, tricks, and discussion on various Backpacking, Hiking & Camping topics.

Topics Discussed / Gear Seen

MalloMe Camping Cookware Mess Kit Review

A Review of the MalloMe Camping Cookset.

The MalloMe Cookware set is a 10 piece nesting mess kit for backpacking and camping that I’ve had for about year now, with great results.

While I typically pack pretty minimal for my solo backpacking trips, for group backpacking trips and snow melting in the winter, I’ve grown to really like this budget mess kit. It’s also quite nice for more involved backpacking meals and trail food cooking.

Items included with the MalloMe Cookware Set

  • Aluminum 1 Liter Pot
  • Pot Lid
  • Aluminum Frying Pan
  • 2 BPA Free Bowls
  • Folding Stainless Steel Spork
  • BPA Free Soup Spoon / Ladel
  • Wooden Spoon Spatula
  • Cleaning Sponge
  • Folding Stainless Steel Fork (free bonus)
  • Nylon Travel Bag Drawstring Pouch

Other Trail & Backpacking Cooking Items Seen

Toaks 450ml titanium cup
Toaks 750ml titanium cook pot 
Sea To Summit Alpha Light Long Spoon
Budget Canister Stove

Gregory Optic 48 Review

A Review of the Gregory Optic 48 Backpack. 

The Optic line of backpacks is aimed at weight conscious and ultralight backpackers. There is a larger Gregory Optic 58 for those with additional space needs as well as a women’s version called the Gregory Octal 45 and Octal 55. All of these packs are very similar, so this review should hopefully be applicable to hikers looking at any of these backpacks.

You can check out my full 7.5 lb Summer Ultralight Backpacking Gear List using the Optic 48 here: Sintax77’s Summer Ultralight Backpacking Gear List 2018

You can see the Optic 48 in action on my ‘Hiking the Standing Indian Loop – 3 Day Hammock Camping‘ video where I take it out for a 3 day, 2 night backpacking trip in the Nantahala National Forest.

Gregory Optic 48 Specs, as per the manufacturer

  • Gear Capacity (L)
    SM: 45
    MD: 48
    LG: 51
  • Gear Capacity (cu. in.)
    SM: 2746
    MD: 2929
    LG: 3112
  • Product Dimension h x w x d
    SM: 26 x 12.5 x 10.5
    MD: 28 x 12.5 x 11.5
    LG: 30 x 12.5 x 12
  • Weight (lbs)
    SM: 2.39
    MD: 2.47
    LG: 2.62
  • Rain Cover Weight (lbs)
    SM: .21
    MD: .21
    LG: .21
  • Stripped Weight (lbs)
    SM: 2.28
    MD: 2.37
    LG: 2.51
  • Material(s)
    100% Nylon

*Optic 48 pack furnished by Gregory for Trial & Evaluation. Opinions expressed are my own.