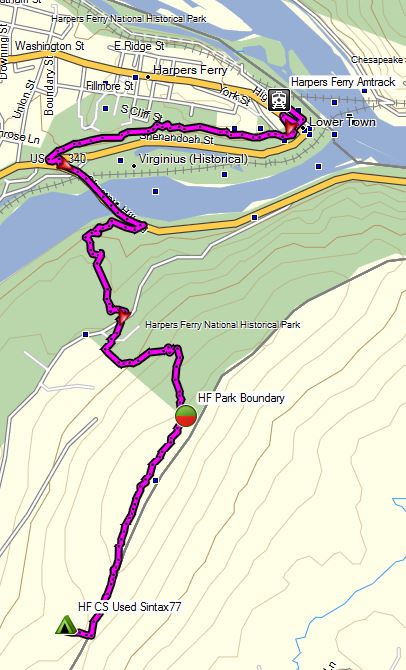
Join Mike and I for for a “Train to Trail” Winter Camping, Backpacking, Campfire cooking, & Hiking adventure in Harpers Ferry, WV.
We tried something a bit different for fun on this winter camping trip – instead of driving, we decided to take an Amtrak train directly to the trailhead. This is actually and idea that Mike and I had been kicking around for a while now. The first challenge was finding an interesting trail that was actually close to a train station, without a need for secondary transportation or an excessive walk. After a bit of research, we determined that Harpers Ferry, West Virginia fit the criteria quite well. The train practically dumps you right on the Appalachian Trail. We booked our tickets, packed our bags, and hit the trail, er, I mean, train station.
With 4 days and 3 nights off, we had a decent amount of time to play with on this trip. The challenge however, would be that we needed to plan an out and back trip that didn’t put us to far away from the train station on our final morning, rather than doing a loop like we normally prefer. Fortunately, we quickly realized that to be a perfect excuse to do a a laid back, more camping, less hiking kind of trip.
The plan? After leaving the train behind,we would hop on the Appalachian trail for a few miles – just long enough to feel the seclusion of the deep winter woods, and set up a base camp for the duration of the trip. Other than that, we really had no hard set plans, other than relaxing, having a good time, and brushing up on our campfire cooking skills. Did we succeed? I guess you’ll just have to watch and see…
Trails Used
Leave Harpers Ferry via Appalachian Trail South After around 3 miles, bushwack West to unofficial campsite.
Return via Appalachian Trail North
Join Sara & for some backpacking, hiking and hammock camping along the Appalachian Trail in Virginia’s James River Face Wilderness Area.
For this fall backpacking trip we’ll be dipping into the world of the Appalachian Trail while testing out some new hammock camping gear – most notably, the Amok Draumr 3.0 Hammock system. The Draumr is a rather unique flat hammock that I touched on in a previous blog post and video, ‘Amok Draumr 3.0 – A Super Flat Hammock? – First Look‘. As discussed in that video, the Draumr works in conjunction with an inflatable sleeping pad to create what is essentially a floating bed. It can also be used in a chair configuration for lounging at camp. In addition to testing out the Draumr, I’ll be trying out some whoopie slings rigged up with some Dutch Whoopie Hooks. The hooks allowed for a really quick and simple way to attach and detach the whoopie slings to my trusty Darien Dream Hammock.
With our shelter and sleeping methods squared away, we were ready for some exploration of the east coast’s most fabled long distance hiking path – the Appalachian Trail, the “AT” as it’s affectionately called by those of us who prefer a nice acronym now and the. While I’ve incorporated pieces of the AT into many of my trips before, this particular hike seemed to really capture the spirit and flavor of the Appalachian Trail.
James River Face Wilderness – Route Overview – Sintax77
Along the way, we bumped into and chatted with some friendly southbound Thru-hikers (or “SoBo’s” as they’re commonly called), checked out a classic example of an Appalachian Trail Shelter (Matt’s Creek Shelter), got some great laughs and stories out of the shelter’s trail journal, and got a healthy dose of rolling ridge line views. While it was obviously no comparison to the experience of actually being out on the AT for five to seven months over the course of it’s roughly 2,200 miles, it was a great little 2 day crash course of what life might be like for the some of the 12,000 or so alumni who have hiked the Appalachian Trail since it’s inception back in 1937.
Who knows, maybe some day Sara and I will be among those dedicated hikers as well, but for now, the occasional appetizer version is quite tasty too! Below is are some details on the section that we did. GPS track data, along with waypoints for our campsite and other points of interest are available for download on our Trip Data Page as well.
Trailhead and Parking: James River Footbridge N37° 35.819′ W79° 23.474′
The James River Face Wilderness Area is a protected area located within the Jefferson National Forest, about 1 hour north of Roanoke, Virginia.
Route Taken and Trails Used, Day One
Access the James River Foot Bridge by heading out of parking lot and passing under the railroad trestle. SinFact: This is the longest pedestrian ridge on the entire Appalachian Trail
Leaving the foot bridge, turn left to continue following the AT along the banks of the river for a while.
The trail will eventually turn away from the river and and head deeper into the woods,following along Matt’s Creek.
Arrive at Matt’s Creek Shelter for a snack break at the picnic bench, and an entertaining peek at the shelter log.
Leaving the shelter, head up the ridge to continue on the Appalachian Trail and get some views of James River, flowing below.
5 miles into the hike there will be a decent lunch spot (marked in my GPS data) with a nice, flat sunny area for lounging before ascending further up the the ridge. This spot was also the last flowing water source we encountered for the rest of the day. If you plan to camp up on the ridge in the same area that we did, make sure to stock up on enough water for the rest of the day, as well as tomorrow for breakfast and the hike out, to be safe.
Continue on the AT until arriving at the three way junction with Balcony Falls Trail and Sulphur Springs Trail. This is where we departed the AT and headed down the Sulphur Springs trail in search of a campsite for the night.
Note: Sulphur Springs trail does not appear to be officially maintained and may be quite grown in and harder to navigate in the summer.
Trip variation Option: If you continue on the Appalachian Trail for another half mile you will reach a junction with the Belfast Trail. About a half mile or less down the Belfast Trail is a possible campsite near the intersection with the Gunter Ridge Trail. It’s important to note that I haven’t personally been to this site, so I’m not sure how legit it may be. It’s location is approximated based on comments I’ve seen posted online, combined with topo map data and may not actually be a suitable site. We chose not to venture that way, but from looking at a photo I found online, it looks like a rather flat, alternate site for camping. Approximately a mile beyond Gunter Ridge campsite is the Devil’s Marble yard, a potential side trip that I hear has very nice views. Nearby is another possible site, marked in my GPS data as well.
Continue along the Sulphur Springs trail for a little less than a mile.
Camp at either of the site’s listed in my GPS Data. We chose the smaller spot labeled “JRF CS Night 1” for it’s better views off the ridge for sunset. On the other side of the trail there is also a larger potential camping area labeled “JRF Hickory Stand CS”. This spot lacks the views down the ridge, but is larger and offers potentially better wind protection, depending on conditions.
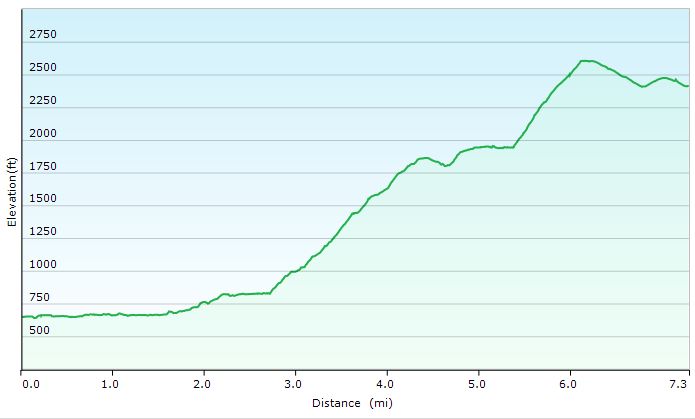
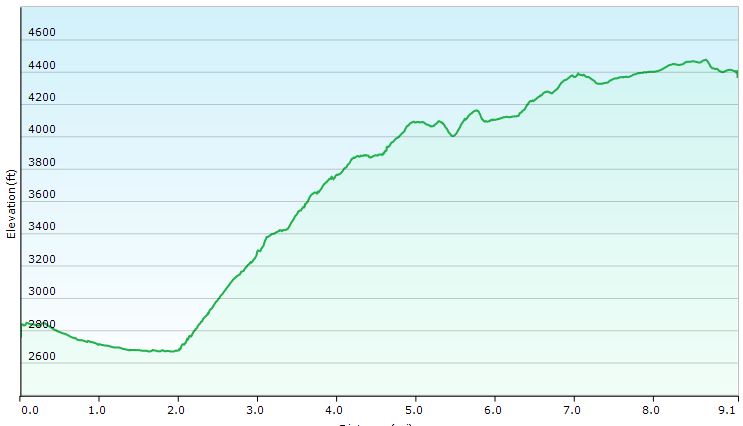
Day 1 Total Mileage: 6.8 Miles Day 1 Total Elevation Gain: 2,297′
Sintax77 – James River Face Wilderness Loop – Day 1 Elevation Profile
Route Taken and Trails Used, Day Two
After packing up camp, you have two options. While it’s possible to continue down the meandering Sulphur Springs Trail for a couple until it runs into the AT, we chose instead to immediately start our day back on our old friend, the AT. This was possible by doing a very small “bushwack” west from the campsite until you run into the adjacent campsite then head south on the AT by turning left. The campsite is literally right smack between the two trails, so the AT should be super easy to spot.
Continue along the AT until you hit the triple junction with Sulphur Springs, the AT and Piney Ridge Trail.
Head down the Piney Ridge Trail, towards Hunt Club Road, which will eventually bring you to Rt 501 Lee Jackson Highway.
Turn left (north) to do a road hike along Lee Jackson Hwy for a short bit, at which point you have two options:
After a mile or so, the Highwater Trailhead (the old AT) will appear on the left side of the road. The sign will actually be for Matt’s Creek, where we were the day before. You can take this trail all the way back to the shelter, then backtrack to the parking lot on the AT, the same way you came in on day one. From trailhead to car looks to be about 4 miles.
We chose to make a more expedient route back to the car, by continuing to walk along the road, over the auto bridge’s pedestrian sidewalk. This route gave us a pretty cool view of the man made waterfall, as well as an alternate view of the rail trestle and footbridge that we had traveled over the previous day.
Arrive back at the Jame River Foot Bridge Parking lot and prepare yourself for cheeseburger time.
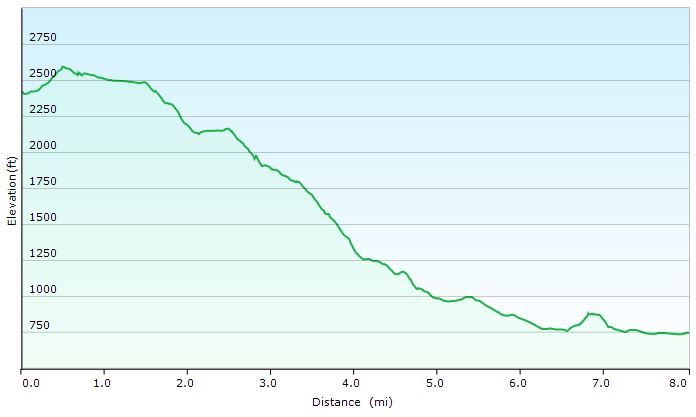
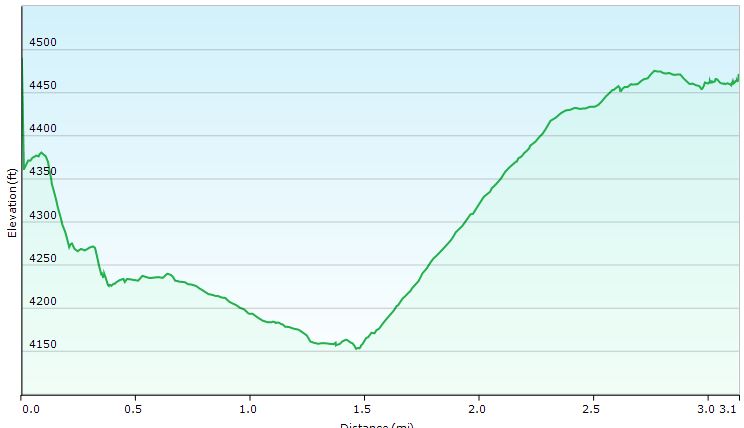
Day 2 Total Mileage: 8 Miles Day 2 Total Elevation Gain: 486′
James River Face Wilderness – Day 2 Elevation Profile – Sintax77
Trip Mileage Grand Total: 14.8 Miles Trip Elevation Gain Grand Total: 2,783′
Join Sara and I for some hiking, trail cooking, and backpacking on a hammock camping trip in Shenandoah National Park.
For this hiking adventure, Sara and I will be revisiting Shenandoah National park for Sara’s second dose of hammock camping out in the wild along with a healthy dose of backcountry cooking and camp food. We did a previous backpacking trip not too far from here in Shenandoah a mere two weeks before, and it went quite well. It wasn’t, however, exactly the experience that we had set out to do.
You see, for that particular trip, I may have sold it as a rather relaxed excursion. And depending on your perspective, it very well may have been just that. But for Sara, who’s most recent backpacking memories prior to that trip were that of a grueling elevation-fest through the White Mountains, it wasn’t quite the reprieve we were looking for.
The required prescription was a high dose of low mileage, potent lounging, and dense pancakes. Thankfully, the trip seen in this video hit the spot. Below are some details and trip data for the trip, although there isn’t much of it. But that’s exactly what we were going for. Check out my Trip Data Page to get full GPS data for this trip.
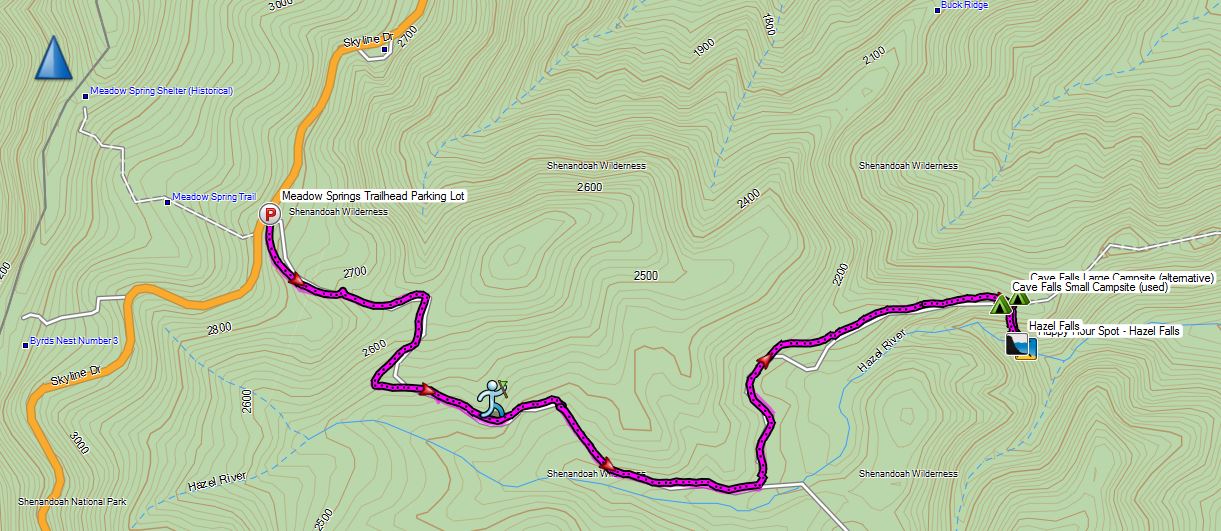
Parking: Meadow Spring Trailhead (Mile 34 on Skyline Drive)
N38° 38.304′ W78° 18.823′
Day 1 Trails Used (in order): Hazel Mountain Trail
Turn Left on White Rocks Trail Camp along White Rocks Trail (see my GPS Data for potential campsites on either side of trail)
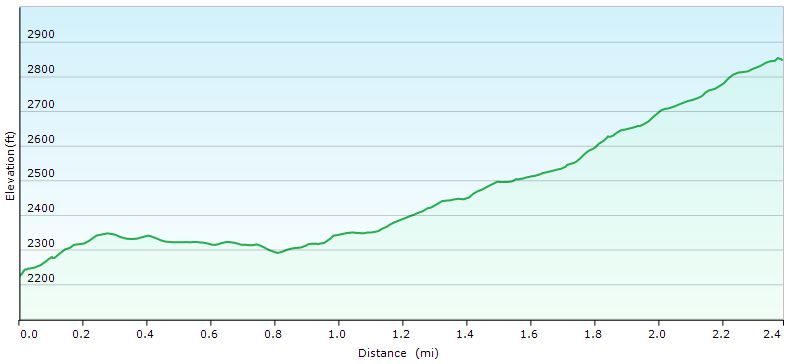
After setting up camp, take a half mile round trip down to Hazel Falls, for happy hour.
Day 1 Stats: Mileage: 3.2 miles (includes half mile excursion from camp down to Hazel Falls and back) Gross Elevation Gain: 390′ Gross Elevation Loss: 1,175′
Day 2 Trails Used (in order):
Wake Up, Eat Pancakes (this is important – trip will not work properly without this step!) White Rocks Trail
Right on Hazel Creek Trail
Day 2 Stats: Mileage: 2.5 miles (not nearly enough to burn off those pancakes, you’re gonna have to go to the gym tomorrow…) Gross Elevation Gain: 699′ Gross Elevation Loss: 75′
Notable Backpacking Food for this Trip: Bisquick Shake ‘n Pour Pancake Mix Packit Gourmet Dehydrated Maple Syrup and Blueberries
Packit Gourmet Queso Dip with a regular ol’ bag of Tostito’s Scoops (wheat, because we’re obviously healthy and stuff)
Packit Gourmet Texas State Fair Chili (I lost my mind eating this stuff on this winter video, after climbing Mt Washington)
I recently had the opportunity to do an appearance on a relatively new podcast geared towards those of use who prefer to sleep above the ground. About a month or two ago, the hosts, Jonathan and Mark, sent me an invite to do an in person recording while Jonathan was not to far from my hometown on business. In the time since, I’ve actually listened to all of their podcasts so far and have been enjoying the opportunity to listen to an outdoors podcast that really focuses on hammock camping specifically.
So far, they’ve had some pretty cool guest from the hammock camping industry / scene, including Tom Hennessey, Dutch from Dutchware Gear, Shug Emery, and Derek Hanson. From talking to Jonathan, it sounds like they’ve got even more interesting guests lined up for the rest of 2016, so it should make for some good listening in the future. Hopefully my appearance doesn’t pull that curve down too far 😉
For the SinChats video, I take a little trip down memory lane of the various talk radio shows and podcasts that I’ve enjoyed and been influenced by over the years, along with a discussion of camping and backpacking specific podcasts that are available out on the internet. So, what are your favorite outdoor, camping, or backpacking podcasts?
Come along for 3 days of ultralight backpacking and fall camping in West Virginia’s Cranberry Wilderness.
For this adventure, I’ll be taking my newly refined ultralight backpacking loadout for a three day overnight hiking and camping trip in West Virginia’s Cranberry Wilderness. After my last couple of vista-packed trips, I’ve had some requests for more footage & discussion once we get to camp – site selection, shelter setup, fire making, cooking, etc. Well, this video has plenty of all that, and then some. In fact, this ended up being my longest feature length video so far.
For those of you looking for something a little lighter, there’s a full back catalog of shorter videos that might hit the spot, but if you’re ready to get into the finer details of ultralight backpacking gear and spending time outdoors (from my own warped perspective of course), then this is the video for you. A little gift for the hardcore fans 😉
Overview of the route I took. Recorded with my Garmin Oregon 650 GPS.
Parking: North South Trailhead on State Route 150
38.276530, -80.237829
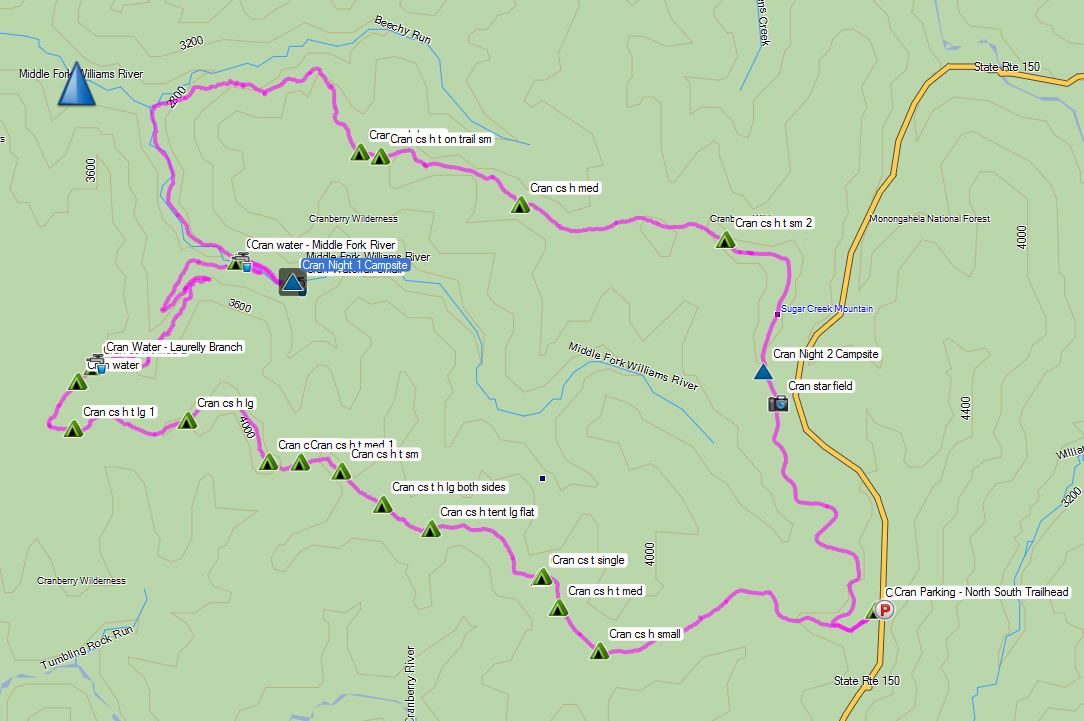
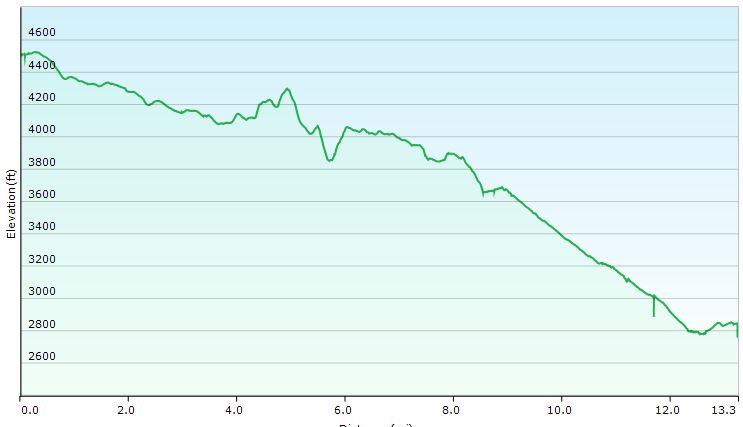
Trails Used Day 1
Start at North South Trail Head on West Virginia SR 150
TR 688 North South Trail
TR 267 Laurelly Branch Trail
TR 271 Middle Fork Trail
Setup Camp on Hell for Certain Branch
This is a large campsite across from trail on opposite side of the Middle Fork River with plenty of fresh water available from the nearby river.
Day 1 Total Mileage: 13.2 miles Day 1 Gross Ascent: 1,102′
Trails Used Day 2
Backtrack on TR 271 Middle Fork Trail towards junction from previous day
Continue on TR 271 Middle Fork Trail
TR 207 Big Beechy Trail
Setup Camp just after summit of Sugar Creek Mountain.
This is a medium-small Campsite, in a beautiful mossy area. Make sure to pack in enough water, as there are no nearby sources. The elevation was around 4,400 feet and the landscape was somewhat conducive to wind, so be prepared for temps that are possibly quite a bit lower than locally forecasted.
Day 2 Total Mileage: 9.06 miles Day 2 Gross Ascent: 2,405′
Trails Used Day 3
Continue on TR 207 Big Beechy Trail
TR 272 North Fork Trail
TR 688 North South Trail towards SR 150
Return to North South Trailhead Parking Lot
Day 3 Total Mileage: 3.17 miles Day 3 Gross Ascent: 367′
Total Mileage for Trip: 25.39 miles Total Gross Ascent for Trip: 3,974′
Join me for 3 days of hiking, backpacking, and stealth camping in the White Mountains.
For this late Summer trip (August), I’ll be going for the full range of White Mountains backpacking and hiking experiences. From the seclusion of rugged wilderness areas, to the tourist laded summit of Mount Washington. Encompassing both the western and eastern sides of Rt 16, the goal is to complete a 3 day loop comprised of the Presidential Range, Tuckerman Ravine, Wildcat Range, and the Carter-Moriah Range before returning to the car.
The 11lb base weight system seen in that video is identical to my system for this trip with the exception of the following changes which increased the base weight by about 2.5 lbs:
I carried around 7lbs food and water (usually only 1 liter), so total pack weight was still around 20 lbs or so.
GPS Tracking Data for Entire Trip is Available for download on the Trip Data page.
**Tracks for each day end on the trail prior to picking a specific campsite. Recording is resumed on the beginning of each day, back on the trail from night before.
Parking: Imp Trail head 44°19’23.40″N 71°13’0.99″W
(**not starting on Imp trail, this will be the finish)
Trails Used (in order):
Day 1
Road Hike to Dolly Copp Campground
Begin on Daniel Webster-Scout Trail
Osgood Trail
Gulfside Trail (passing Madison Spring Hut on descent)
Mt Jefferson Loop Trail
Return to Gulfside Trail
Sphinx Trail
Stealth Camp towards bottom of Sphinx Trail in the Great Gulf Wilderness Daily Totals: 11.40 Miles, 6,008 feet elevation gain
Day2
Back up Sphinx Trail
Gulfside Trail
Trinity Heights Connector (to Mt Washington Summit)
Tuckerman Ravine Trail
Lions Head Trail
Alpine Garden Trail
Tuckerman Ravine Trail
Grab a drink at Pinkham Notch Visitor Center and cross Rt 16 to
Lost Pond Trail
Wildcat Ridge Trail
Stealth Camp before getting to Carter Notch Hut Daily Totals: 13.80 Miles , 6,755 feet elevation gain
Day 3
Carter-Moriah Trail
Carter Dome Trail
Nineteen Mile Brook Trail Totals: 8.77 miles, 2,471 feet elevation gain
Trip Grand Totals: 34 Miles, 15,234 feet elevation gain.
Summit’s for this Trip in order:
Mt Madison, Mt Jefferson, Mt Washington, Wildcat D, Wildcat C, Wildcat B, Wildcat Mountain, Carter Dome, Mt Hight


 Hammock –
  for use with Draumr Hammock (30D Double Silicone Coated Ripstop Nylon, Fully taped seams, Reflective guy lines)
 LED Flashlight
 Headlamp (
 (
(


 (
( (
( w/ cheap dollar store utensils for cooking


 trail runners
 (21oz) replaced with
  . (3lbs)