Mail Call – New Sawyer Select Water Filter & Outdoor Vitals MummyPod Hammock Sleep System

In this episode of Sintax77’s Mail Call, I check out the new Sawyer Select foam water filter, and a hammock camping sleep system by Outdoor Vitals called the StormLoft Mummy Pod, along with their netless hammock system with whoopie slings.

I also open some viewer mail and discuss Permethrin vs Picaridin vs Deet for tick and mosquito treatment of backpacking and camping gear.

Links and Info for the Sawyer Select Water Filtration System

  • Official Sawyer Select Filters Webpage Link
  • The three Select systems reduce chemicals down to 0.5 parts per billion (up to 40 times lower than the EPA’s maximum recommended level) and reduce pesticides down to 0.01 parts per billion (400 times lower than the EPA’s maximum).
  • The Select S2 and Select S3 models go even further, purifying contaminated water from suspect sources.
  • Select S2 filters out 99.99% of viruses.
  • Select S3 filters out 99.99% of viruses and reduces heavy metals such as copper, arsenic, and mercury down to 0.5 parts per billion (up to 260 times lower than the EPA’s maximum).
  • Weight: 9.25 oz total for bottle with foam filter and hollow fiber membrane filter attachment.

Links and Manufacturer’s specs for the Outdoor Vitals 15° StormLOFT Down Mummy Pod

  • Official SormLOFT MummyPod Webpage Link
  • Easily switches from use as a mummy sleeping bag to a pod system to fully insulate a hammock!
  • Patented footbox allows hammock to run straight out of the bottom of the bag and seal, or zip it up for use on the ground and insulating baffles keep your feet warm!
  • Redesigned shoulder baffles seal cold air out and add additional comfort!
  • StormLOFT™ 800 fill power hydrophobic down provides premium performance in both loft, warmth and dealing with adverse weather conditions!
  • NEW YKK Anti Snag Zipper makes it virtually impossible to damage your sleeping bag while zipping it up. It also provides easier zipper flow making it a breeze to get in and out!
  • Vertical baffles keep the down locked into place both on the hammock and on the ground.
  • Included suspension system keeps the bag from sagging or moving when using it on the hammock
  • Extra shoulder room (grid) keep the bag extremely comfortable and roomy.
  • Outdoor Vitals Lifetime Warranty: Here at Outdoor Vitals we believe in standing behind the craftsmanship and quality of our products. Anything that was our fault, we fix so you can feel confident that you’re getting exactly what you paid for!

Links and Manufacturer’s specs for the Outdoor Vitals Ultralight Solo Hammock

  • Official Outdoor Vitals Ultralight Solo Hammock Webpage
  • Weight: 14 oz (finished model may be 13 oz)
  • Hammock & Carabiners: 9.5 oz (finished model may be 8.5 oz)
  • Suspension System: 4.5 oz
  • Unfolded size: 9′ x 4′
  • Compact size: 7″ x 4.5″
  • 7/64 inch dyneema™ whoopie sling
  • 1 inch thick by 6 foot long double looped polyester tree strap
  • 40D ripstop nylon fabric
  • Triple stitched
  • Wire gate high grade aluminum carabiner
  • Rated to 300 lbs when used properly

Hiking the Dix Range Pt 1 – Adirondacks 3 Day Backpacking Trip | Hammock Camping

Join Sara and I for 3 days of Hiking & Hammock Camping on a Backpacking Trip in the Adirondack’s Dix Mountain Wilderness.

For this backpacking adventure, I’ll be breaking the hiking trip into two parts. Part 1 covers our hike in to camp, setting up our base camp with our two person hammock camping system, and some campfire chat while we make a campfire, do camp chores, and cook some backpacking food.

Hiking the Dix Range Part 2 will be comprised of mostly hiking and summits, as we ascend from camp up onto the Dix Range to hit the Beckhorn (a subsidiary peak of Dix Mountain) and the summit of Dix Mountain itself.

GPS Data for this trip is available on the Trip Data Page or by clicking this link for direct download: Adirondacks Dix Range Backpacking Trip 2017 – Sintax77

Trailhead and Parking Location

Elk Lake Trailhead Parking Lot, 675 Elk Lake Rd, North Hudson, NY 12855
44°01’15.0″N 73°49’40.9″W

Topics discussed and things that happen in this episode

  • Base camping with a ton of camping gear vs ultralight backpacking.
  • Finding & legal camping spots in the Adirondacks.
  • Pros and cons of using a bear canister. These are not legally required in the Dix Mountain Wilderness, but we had one anyway, for reasons discussed in the video.
  • Hammock camping with our dog, Denali.
  • Outfitting our Dutchware Chameleon Hammocks with the Double Dutch Bugnet system.
  • Hammock under quilt attachment using of Chameleon hammock’s underquilt hooks.
  • A look at the MalloMe Camping Cookware Set for backpacking food preparation.
  • Building a campfire and cooking some of of favorite backpacking appetizers and dinners.
  • Sara reviews a flashlight…

Trails Used Day 1

  • Parked at Elk Lake Trailhead Parking Lot.  This is a decent sized lot along a gravel road on the way to the Elk Lake Lodge.  If the lot is full, you may park for free at the Elk Lake Lodge, a bit further up the road.
  • Elk Lake to Dix Mountain Trail
  • Pass the Slide Brook Lean-to . The Slide Brook LT and camping area makes for a popular base camp for hikers hitting the Dix Range. We chose to push on a bit (under 2 miles) to the lesser used Lillian Brook lean-to area, which as some nice, legal campsites that are a bit more secluded.
  • Pass the sign for Lillian Brook LT and continue a bit further.
  • Setup camp along the Elk Lake Trail, after the Lillian Brook LT and just before the large bridge crossing Lillian Brook.  As of 9/14/17, this site had a yellow “Camp Here” disc, designating it a fully legal spot, despite it’s proximity to a small stream nearby. The stream is probably a convenient water source when flowing good, but we opted to get our water a 100 meters or so down the trail by the Lilian Brook bridge.

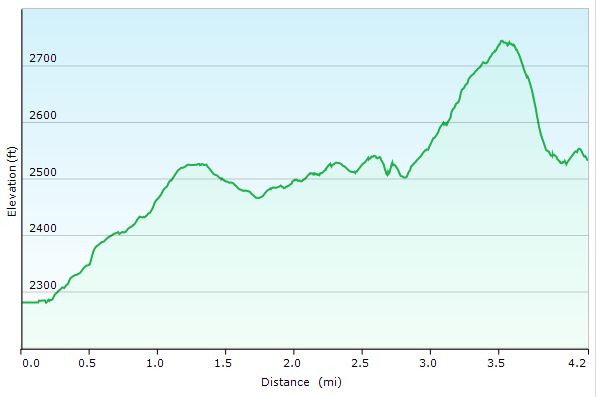
Dix Range Adirondacks Day 1 Elevation Profile – Sintax77

Day 1 Total Mileage:  4 miles
Day 1 Gross Elevation Gain: 633 feet
Day 1 Gross Elevation Loss:  339 feet

Notable Camping / Backpacking Gear Seen on this Video

Our Dog’s Backpacking Gear

Backpacking Food

Stay tuned for Hiking the Dix Range Part Two where we depart camp and head for ridge.

Backpacking Gear for Hammock Camping – Which Items to Buy First?

A discussion on deciding which backpacking gear items to buy / upgrade first when first getting started with hammock camping.

A viewer, Chuck C., recently sent me the following question:

“I have been buying my gear spread out so the wife won’t kill me. Rank these in the order you would buy:

  • Cuben Fiber Tarp
  • Down Under Quilt
  • Down Top Quilt
  • Hammock
  • Backpack

In the video I try to answer this question as well as get some discussion going on the topic of hammock camping gear in general.  Which items would you upgrade or buy first?

Two Hammocks, One Bug Net – Double Dutch and Birds Nest Bugnet Systems

Checking out two bugnet options for double hammock camping – The Bird’s Nest (for use with any two hammocks), and the Double Dutch Bugnet (for use with the Chameleon Hammock), both made by Dutchware Gear.

Both of these bugnet systems are designed specifically for use with double hammock, spreader bar systems.  i.e. Putting two hammocks on a single pair of trees for use with the same tarp. While I showed the Beetle buckle suspension (stock suspension that came with my Chameleon Hammock) for use with the spreader bar, there are several suspension options that would work with this setup as well (links below.

Gear Seen and Links for More Info

Two other suspension options (not shown) that would work with the spreader bar

Tarp mentioned in the video for use with the double hammock setups

Catskills Hiking & Trail Pizza – Backpacking with our Dog

Join Sara, our dog Denali, & I for some Catskills hiking, trail cooking, backpacking, and hammock camping in upstate New York.

For this backpacking trip, we’ll be hiking and camping near Slide Mountain and the East Branch Neversink River in the Catskills, complete with a visit to the summit of Table Mountain and Peekamoose Moose Mountain.  The mileage will be low, but the star of this trip isn’t the trails.  It’s the food.  Good old, classic trail cooking.

What’s on our backpacker’s menu?  Well, Sara had a craving for some trail pizza in the middle of the woods somewhere, and I was up for the challenge.  Were we successful?  You’ll just have to come along and find out.  Either way, it’s bound to be an adventure.  😉

Full GPS data for this, as well as all of my other trips, is available on the Trip Data page.

Trailhead Used:  
Denning Rd Trailhead  N41° 57.924′ W74° 27.144′


Trails Used Day 1, in Order

Pheonicia East Branch Trail
Peekamoose Table Trail
Set up camp after second bridge (the double log one) at N41° 58.474′ W74° 25.734′
Continue up Peekamoose Table Trail towards summit of
Table Mt and Peekamoose Mountain
Lunch / Snack at summit and
Return to camp on the East Branch Neversink River

Day 1 Mileage: 7.8 miles, including summit round trip (about 3 miles each way)
Day 1 Gross Elevation Gain: 2,130′

Trails Used Day 2, in Order

Peekamoose Table Trail
Pheonicia East Branch Trail
Return to vehicle at Denning Rd Trailhead

Day 2 Mileage: 1.8 miles
Day 2 Gross Elevation Gain: 
146′

Trip Total Mileage: 9.6 miles
Trip Total Elevation Gain: 2,276


Trail Pizza 
Ingredients

Boboli Pizza Crust, Individual Size – 2 Pack
Boboli Pizza Sauce Individual Pack (comes in 3 pack box)
Cabot Mozzarella Cheese, Shredded – 8 oz package (2 cups volume)
Hormel Pepperoni, pre-sliced – 6 oz package (enough for 2 pizzas, plus snacking)
Camp Cooking Gear Used for Pizza

Pair of cheap aluminum tongs (from dollar store, or whatever)
Coghlan’s Camp Grill  – rack used to hold pizza
Fozzils Bowlz (used as a plate / prepping dish / cutting board)
Sea-to-Summit Alpha Utensil Set

Train to Trail – Harpers Ferry Winter Backpacking Trip – Hiking in Virginia

Join Mike and I for for a “Train to Trail” Winter Camping, Backpacking, Campfire cooking, & Hiking adventure in Harpers Ferry, WV.

We tried something a bit different for fun on this winter camping trip – instead of driving, we decided to take an Amtrak train directly to the trailhead.  This is actually and idea that Mike and I had been kicking around for a while now.  The first challenge was finding an interesting trail that was actually close to a train station, without a need for secondary transportation or an excessive walk.  After a bit of research, we determined that Harpers Ferry, West Virginia fit the criteria quite well.  The train practically dumps you right on the Appalachian Trail.  We booked our tickets, packed our bags, and hit the trail, er, I mean, train station.

With 4 days and 3 nights off, we had a decent amount of time to play with on this trip.  The challenge however, would be that we needed to plan an out and back trip that didn’t put us to far away from the train station on our final morning, rather than doing a loop like we normally prefer.  Fortunately, we quickly realized that to be a perfect excuse to do a a laid back, more camping, less hiking  kind of trip.

The plan?  After leaving the train behind,we would hop on the Appalachian trail for a few miles – just long enough to feel the seclusion of the deep winter woods, and set up a base camp for the duration of the trip.  Other than that, we really had no hard set plans, other than relaxing, having a good time, and brushing up on our campfire cooking skills.  Did we succeed?  I guess you’ll just have to watch and see…

Trailhead:  Harpers Ferry Amtrak Train Station

GPS Data for this trip available on the Trip Data Page.

Harpers Ferry Winter Route Overview Sintax77

Harpers Ferry Winter Route Overview Sintax77

Trails Used
Leave Harpers Ferry via Appalachian Trail South
After around 3 miles, bushwack West to unofficial campsite.
Return via Appalachian Trail North

Notable Gear Used on this Trip by Mike
Gregory Palisade 80 backpack
EMS Down Parka
EMS Ascent Hard shell Jacket
MSR Whisperlite International stove
Dream Hammock Thunderbird Hammock
Hammock Gear Burrow 20 top quilt
Hammock Gear Incubator 20 underquilt
Hammock Gear Cuben Hex Tarp with doors
Portable bluetooth speaker with fancy lightshow
GSI cookset

Notable Gear Used on this Trip by Sintax77
EMS Longtrail 70 backpack (2011 version)
Montbell UL down parka
EMS Ascent Hardshell
MSR Rapidfire stove (see my video on it here) *no longer manufactured – modern equivalent is the MSR Windpro.
MSR Flex Skillet
Dollar Store tongs and turner for cooking
Sea to Summit Alpha Cutlery Set
Fozzils Bowl / Plate
Dream Hammock Darien Hammock
Hammock Gear Burrow 0 top quilt
Hammock Gear Incubator 0 underquilt
Hammock Gear Cuben Hex Tarp (standard model, no doors)
Pocket Chainsaw
SOG Flash I tanto blade pocket knife